How to Setup and Install Intelbras WRN 240 Slim Router: Complete Technical Guide
To configure the Intelbras WRN 240 Slim router, you must connect the Ethernet cable from your broadband modem to the blue WAN port on the router, connect your computer to one of the yellow LAN ports using an RJ45 patch cable, open a web browser, and log in to the IP address 10.0.0.1 by typing admin as the default username and admin as the default password. This administrator dashboard allows you to select the WAN connection type required by your internet provider (such as PPPoE with authentication credentials or Dynamic IP) and adjust the wireless settings to set up a personalized network name (SSID) and a secure WPA2-PSK AES security key to protect your home network from unauthorized connections.
1. Technical Specifications and Hardware Architecture
The Intelbras WRN 240 Slim is a wireless router designed for small home environments and small office spaces looking for an affordable solution to handle basic internet traffic and simple smart home automation setups. Operating on the 2.4 GHz frequency band under the IEEE 802.11n standard (backward compatible with 802.11b and 802.11g modulations), this model provides a maximum nominal wireless transfer speed of up to 150 Mbps. It features a single fixed external antenna with a gain of 5 dBi, providing signal coverage for small homes up to 80 square meters (approximately 860 square feet) without thick physical barriers.
For wired connections, the device features one WAN port and four LAN ports, all operating on the Fast Ethernet (10/100 Mbps) standard. This means if your fiber broadband subscription exceeds 100 Megabits per second, the physical ports of the WRN 240 Slim will act as a bottleneck, limiting throughput to approximately 95 Mbps due to IP packet overhead. The internal system is powered by a Realtek CPU and 16 MB to 32 MB of RAM, restricting the recommended number of simultaneous active devices to between 10 and 15 clients.
2. Physical Setup and Cabling Connections
Before launching the administration interface in your browser, ensure all physical connections are set up correctly to prevent routing loops or connection drops. Follow this wiring sequence:
- Power Cycle Your Broadband Modem: Unplug the power cable from your internet modem for 30 seconds to clear its physical MAC address cache and ARP tables;
- Connect the Router to the Modem: Take a standard RJ45 Ethernet cable. Connect one end to your modem's LAN port and the other end directly to the blue WAN port of the Intelbras WRN 240 Slim;
- Connect Your PC to the Router: Use a second Ethernet cable to link your computer's network card to any of the yellow LAN ports (numbered 1 to 4) on the Intelbras router. If your computer lacks an Ethernet port, connect to the default wireless network named "Intelbras" (by default, there is no Wi-Fi password or it is printed on the label underneath the router);
- Power On Your Devices: Plug your broadband modem back into the electrical outlet and wait until the status lights (DSL, PON, Fiber, or Online) turn steady. Next, plug the WRN 240 Slim's power adapter into the wall outlet.
3. Logging Into the Web Management Page (IP 10.0.0.1)
With the cabling in place, your computer will receive an IP address automatically from the WRN 240 Slim's built-in DHCP server (typically in the 10.0.0.100 to 10.0.0.254 range). To access the login screen, follow these steps:
Open a web browser (such as Google Chrome, Mozilla Firefox, or Microsoft Edge). In the address bar at the top of the window, type the default IP address: 10.0.0.1 and press Enter. If the page does not load, verify that your computer's network adapter settings are configured to obtain an IP address and DNS server address automatically in the Windows IPv4 properties window.
An authentication box will appear asking for login credentials. In the "Username" field, type admin (all lowercase). In the "Password" field, type admin (all lowercase). Click "Login" or press Enter. The web interface will load, showing the basic configuration screen or the advanced options menu of the Intelbras firmware.

4. Configuring the WAN Internet Connection (PPPoE & Dynamic IP)
To establish an active internet connection on the router, configure the WAN settings to match your ISP's network requirements. Go to the "Network" menu, then select "WAN". The two most common configuration types are:
PPPoE Connection (Used by local fiber providers and DSL lines): Set the WAN connection type to "PPPoE". In the "Username" and "Password" fields, enter the authentication details provided by your ISP (for example, user@yourprovider.com and the corresponding security key). Set the connection mode to "Connect Automatically" to ensure the router reconnects if a power failure occurs. Set the PPPoE MTU value to 1492 to prevent packet fragmentation issues.
Dynamic IP (Used for cable modems or routed ONT systems): If your fiber modem already handles routing and assigns IP addresses automatically, set the WAN connection type on the Intelbras router to "Dynamic IP" (or DHCP client). The router will receive an IP address from your modem automatically. Keep the MTU value at its default of 1500. Click "Save" to apply your settings.
5. Customizing Your Wi-Fi Network Settings (SSID and Security Keys)
Securing your wireless network is essential to prevent unauthorized access and protect your personal data. In the WRN 240 Slim's settings panel, click the "Wireless" menu and select "Wireless Settings". Configure the following parameters:
- Network Name (SSID): Replace the default "Intelbras" name with a unique identifier for your home Wi-Fi network. Avoid using spaces, special characters, or accented letters in the SSID name to prevent connection issues with older smart devices;
- Channel Selection: The router defaults to "Auto." For a more stable connection, select a manual channel. On the 2.4 GHz band, select channel 1, 6, or 11. These are the only non-overlapping channels available, helping to reduce interference from neighboring wireless networks;
- Channel Width: Set the channel width to 20 MHz. Although a 40 MHz width offers higher theoretical speeds, it is more susceptible to wireless interference and reduces the overall signal range of your router;
- Wireless Security: Go to the "Wireless Security" submenu. Select WPA-PSK/WPA2-PSK encryption (WPA2-PSK is the most secure option supported by this hardware). Set the encryption standard to AES (avoid TKIP, as it limits wireless speeds to the older 54 Mbps standard);
- Security Password: Create a strong password containing at least 10 characters, using a mix of uppercase and lowercase letters, numbers, and symbols. Click "Save" to apply and reboot the router.
6. Configurando WDS Wireless Bridging and Port Forwarding Rules
If you want to use the Intelbras WRN 240 Slim as a wireless signal extender instead of a main router, you can configure its built-in WDS (Wireless Distribution System) mode. WDS lets the router connect wirelessly to your main home router and rebroadcast the Wi-Fi signal to expand coverage. Go to the "Wireless" menu and check "Enable WDS". Click the "Search" button to scan for nearby wireless networks. Select your primary network's SSID and click "Connect". You must match the Wi-Fi channel of the WRN 240 Slim with the exact channel used by the primary router. Next, select the matching security type (WPA2-PSK AES) and enter the primary network's password. Crucially, navigate to the DHCP settings page and set the DHCP Server to "Disabled" so that the main router retains sole control over assigning IP addresses on the network, preventing IP conflicts. Finally, change the Intelbras LAN IP to 10.0.0.2 to avoid address conflicts with the primary gateway.
To configure Port Forwarding for hosting gaming servers, configuring local IP cameras, or managing remote desktops, access the "Forwarding" menu and select "Virtual Servers". Click "Add New" and specify the service port (such as port 80 for standard web traffic, or port 3389 for Windows Remote Desktop connections) and the static IP address of the target device on your local network. You can also configure a DMZ (Demilitarized Zone) host under the DMZ menu by entering the local IP of a single device, which opens all incoming ports to that machine. However, exercise caution when enabling DMZ, as it bypasses the firewall and exposes that specific host directly to external security scans.
7. Advanced Wireless Optimization and Signal Stabilization
To improve signal delivery and packet reliability in environments with severe electromagnetic noise, you can fine-tune advanced wireless settings under the "Wireless" and "Advanced Wireless" menu. The **Beacon Interval** is set to 100 milliseconds by default, which is the frequency at which the router broadcasts its presence packets. If you have static IoT devices that lose sync, increasing this slightly to 120 can help, though the default is usually optimal. The **RTS Threshold** (Request to Send) controls the packet size at which the router negotiates channel access with client devices; reducing this from the default 2346 to around 2304 can improve stability in congested networks by reducing collision occurrences. The **Fragmentation Threshold** can also be adjusted to segment large packets, which prevents data corruption in noisy environments. Finally, ensure the **DTIM Interval** (Delivery Traffic Indication Message) is set to 1 or 2, which ensures battery-powered mobile clients wake up from sleep mode at the correct time to receive cached multicast data frames without causing buffer drain.
8. LED Diagnostics and System Troubleshooting Guide
If you experience connection drops, system lag, or forget your administrator password, use these diagnostic steps to resolve the issue. The table below lists the behaviors of the front panel LEDs on the WRN 240 Slim and their troubleshooting solutions:
| LED Indicator | Physical Behavior | System Status | Recommended Troubleshooting Action |
|---|---|---|---|
| Power | Off | No electrical current is reaching the router | Check the 9V power supply and ensure the electrical outlet is working. |
| SYS | Flashing steadily | The system firmware kernel is running normally | No action required. This indicates normal operating status. |
| SYS | On solid or Off | The system has locked up or failed to boot | Unplug the router's power adapter, wait 10 seconds, and plug it back in. |
| WLAN | Off | The Wi-Fi radio is disabled in the settings | Log into the web management page via Ethernet cable and enable the wireless radio. |
| WAN | Flashing rapidly | Active packet transmission over the WAN interface | Normal operation. The router is actively sending and receiving data. |
| WAN | Off | No physical link detected on the WAN port | Check the Ethernet cable linking the modem to the router's blue port. Replace the cable if necessary. |
| LAN (1 to 4) | Off | No device is detected on the corresponding port | Ensure the Ethernet cable is connected securely to both your computer and the router. Check if the PC network adapter is enabled. |
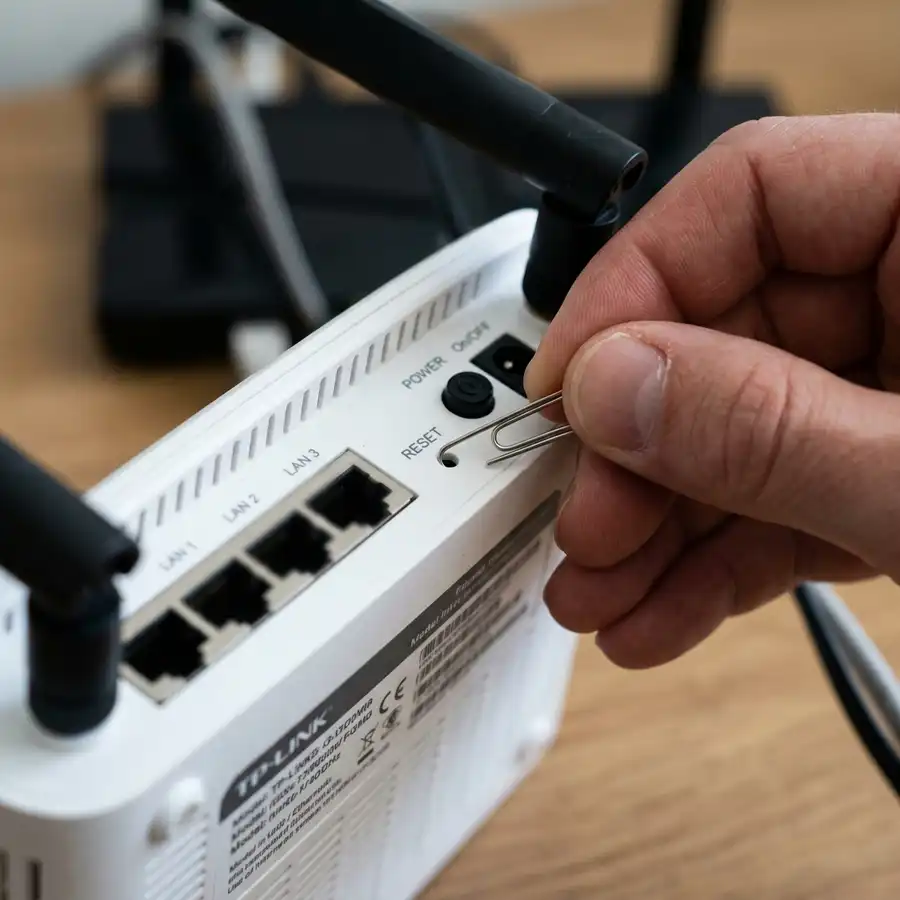
To restore the router to its original factory settings (Factory Reset), locate the small hole labeled RST/WPS on the back of the device. With the router powered on, press and hold the button inside the hole using a paperclip or pin for 10 to 15 seconds. Watch the front panel LEDs: when all indicators light up and flash once, release the button. The router will reboot with its default settings, returning the IP address to 10.0.0.1 and resetting the login credentials to admin/admin.
If you are troubleshooting physical resets on other devices from this manufacturer, check out our guide on how to reset Intelbras router to factory defaults. If you experience slow connection speeds over Wi-Fi while wired devices run at full speed, read our article on resolving slow Wi-Fi but fast Ethernet cable speed issues to learn how to analyze channel configurations and manage radio frequency interference.
Frequently Asked Questions (FAQ)
What is the default IP address of the Intelbras WRN 240 Slim?
The default IP address is 10.0.0.1. The default username and password to log in are both admin (in lowercase letters).
I forgot my administrator login password, what should I do?
You must perform a factory reset. Press and hold the physical RST/WPS button on the back of the router with a pin for 15 seconds. This resets the IP address to 10.0.0.1 and the login credentials back to admin/admin.
Does the Intelbras WRN 240 Slim support 300 Mbps fiber connections?
No, not at full speed. Because the router features 10/100 Mbps Fast Ethernet ports, your wired speeds will be limited to 100 Mbps, and wireless speeds will range between 50 to 70 Mbps due to hardware limitations.
How do I set up the WRN 240 Slim as a wireless repeater?
Log into the web settings at 10.0.0.1, go to the Wireless menu, enable the WDS feature, click Search to scan for your main Wi-Fi network, enter its password, and disable the DHCP server on the Intelbras router.
Extending the Life of Legacy Networking Devices
Setting up the Intelbras WRN 240 Slim correctly allows you to expand your home network without needing to buy new equipment. Keeping the firmware updated helps secure your network against known vulnerabilities. For guides on setting up other popular router brands as extenders, read our article on how to configure a TP-Link router as a Wi-Fi repeater.


