How to Fix Printer Printing Blank Pages Even with Full Ink
Understanding Why Your Printer Prints Blank Pages with Full Ink Tanks
If your inkjet or laser printer is producing completely blank pages despite the ink tanks or toner cartridges being full, the issue is typically caused by airlock bubbles inside the printhead dampers, dried ink obstructing the microscopic printhead nozzles, oxidized electrical contacts on the cartridge carriage, or driver communication errors in the Windows print queue. Even though external ink sensors or page counters report optimal ink levels, the physical absence of ink within the printhead's micro-injection chambers prevents the machine from depositing droplets onto the paper fibers.
To resolve this issue immediately, you should perform manual de-aeration of the dampers using a syringe to re-establish siphon pressure, clean the cartridge copper contacts with isopropyl alcohol to restore electrical connectivity, and run deep cleaning cycles via the software utility to dissolve solid ink clogs. For laser printers, blank sheets indicate a loss of high-voltage transfer bias (HVPS failure) or a disconnected drum ground pin. In this troubleshooting guide, we will examine these mechanical, fluidic, and electrical failures in depth, providing clear solutions for EPSON, HP, Canon, and Brother models.
The Physics of Inkjet Drop Ejection: Thermal vs. Piezoelectric
To diagnose why no ink reaches the page, it helps to understand the physical mechanisms used by modern printheads to propel ink droplets. The drop-on-demand (DOD) methods differ fundamentally between brands, dictating how they handle air integration.
Thermal Inkjet Technology (used by HP and Canon)
Thermal printheads contain hundreds of tiny heating resistors aligned within ink channels. When the printer's logic board sends a sudden electrical impulse, the resistor heats the ink to over 300°C (572°F) in a fraction of a microsecond. This causes localized boiling, producing a rapidly expanding vapor bubble. The bubble acts as a physical piston, pushing the liquid ink out through the nozzle orifice. When the impulse stops, the bubble collapses, and the resulting vacuum draws fresh ink into the chamber.
If air bubbles block the channel (airlocks), or if the printer is run with dry tanks, the resistors undergo a process known as dry firing. Without the cooling properties of liquid ink, the heating resistors quickly overheat and burn out. Once these microscopic circuits are scorched, the printhead is permanently damaged and can no longer project ink, causing permanent blank outputs.
Piezoelectric Inkjet Technology (used by Epson and Brother)
Epson printheads employ piezoelectric crystals positioned behind the ink chambers. When an electric charge is applied, the piezo element deforms (bends) mechanically. This physical contraction decreases the volume of the ink chamber, producing a high-pressure acoustic shock wave that ejects a droplet. Since no heat is used, this method avoids thermal stress and works with a wider range of ink types.
However, piezo printheads are highly sensitive to trapped air. Because liquids are virtually incompressible, the piezo element can easily build up the pressure needed for ejection. Air, however, is highly compressible. If an air bubble enters the piezo chamber, the crystal's physical deformation simply compresses the air pocket instead of pushing the ink. The shock wave is completely absorbed, resulting in empty nozzles and blank pages.
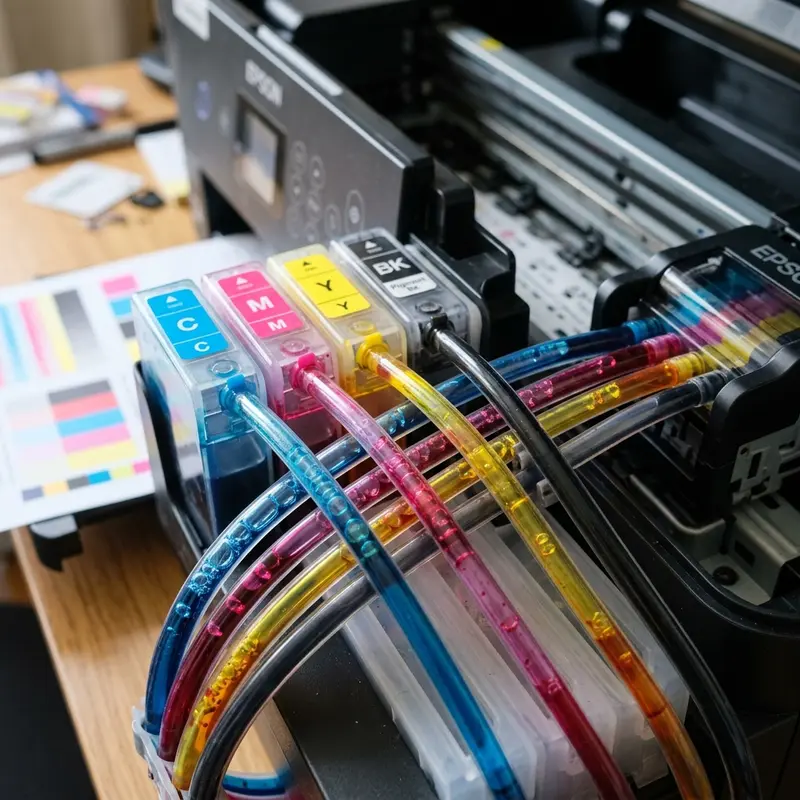
Continuous Ink Supply Systems (CISS) and Damper Mechanics
In tank-based printers like the Epson EcoTank series, ink is drawn from external reservoirs to the printhead through flexible polyurethane tubes. It flows into dampers—small plastic cartridges acting as local reservoirs directly above the printhead nozzles. Dampers feature a spring-loaded flexible membrane and a one-way valve to maintain a steady negative pressure, preventing ink from leaking out due to gravity.
If the printer is moved without locking the ink valve, or if the ink levels drop too low, air will enter the tubing. When this air reaches the dampers, the negative pressure equilibrium is broken. The peristaltic pump at the capping station can no longer draw ink through the bicos due to the lack of hydrostatic siphon action. The printhead carriage will continue to move across the page normally, but it will output entirely blank sheets.
Laser Printer Failure Modes: Why Xerography Fails
If your laser printer is outputting blank pages, the issue is not dry ink but static electricity. Laser printing relies on a multi-stage electrophotographic process:
- The Organic Photoconductor (OPC) drum is given a uniform negative charge by a Primary Charge Roller (PCR).
- A laser beam scans the rotating drum, discharging specific areas to create an invisible electrostatic latent image.
- Toner powder (charged negatively) is attracted to the discharged (neutralized) areas on the drum.
- The paper passes between the drum and the Transfer Roller. The Transfer Roller is charged with a high positive voltage (bias), which pulls the negative toner particles off the drum and onto the paper fibers.
If the Transfer Roller does not receive this positive charge due to a faulty High-Voltage Power Supply (HVPS) or a broken contact spring, the toner remains on the drum and is swept away into the waste bin. The paper emerges from the fuser unit clean and blank. Similarly, a broken laser shutter lever will physically block the laser beam, preventing it from discharging the drum. In this case, the entire drum remains negatively charged, repelling the toner completely.
Troubleshooting Matrix: Printer Printing Blank Pages
Use the following diagnostic table to quickly match symptoms with physical root causes and corrective steps:
| Observed Behavior | Likely Root Cause | Affected Component | Corrective Action | Difficulty |
|---|---|---|---|---|
| Completely blank page, ink tanks are full, tubes have visible air gaps. | Air pockets in the ink supply circuit (airlock). | Tubes & Dampers | Remove printhead cover, extract air from dampers using a syringe. | Medium |
| Blank page after replacing a cartridge or printhead. | Protective tape remains on the nozzle plate. | Nozzle Plate | Remove the adhesive plastic strip covering the printhead contacts. | Low |
| Blank page, error light flashing, printhead moves normally. | Oxidized copper contacts on the cartridge or carriage. | Electrical Contacts | Clean copper contacts using isopropyl alcohol and a soft eraser. | Low |
| Laser printer outputs blank pages, toner is full. | Broken HVPS board contact or jammed laser shutter. | HVPS / Laser Shutter | Check internal spring contacts and laser shutter mechanical arm. | High |
| Nozzle check pattern prints fine, but documents print blank from PC. | Corrupt print spooler data or incompatible driver. | Windows Driver / Spooler | Reinstall the official manufacturer PCL/PS driver; bypass WSD. | Medium |
Step-by-Step Mechanical and Software Fixes
Step 1: Manually Purging Air from EcoTank Dampers
Running software cleaning cycles repeatedly when tubes are full of air is ineffective and fills up the waste ink pads. You must manually draw the ink through the tubes.
- Turn off the printer and disconnect the power cord.
- Open the main access cover. Locate the printhead carriage. If it is locked in the home position (far right), plug the printer back in, wait for the carriage to move, then unplug the power cord to keep it mobile.
- Remove the plastic cover or screw securing the dampers to the printhead carriage.
- Gently lift the affected damper (or all of them) out of its slot. Do not pull too hard to avoid stress on the ink tubes.
- Insert the tip of a clean, needleless 10ml syringe into the round rubber valve at the bottom of the damper.
- Slowly pull back on the syringe plunger. You will see air bubbles travel through the tube, followed by ink filling the damper. Draw about 1.5 to 2 ml of ink (with no foam) into the syringe.
- Carefully remove the syringe and wipe any residual ink from the valve using a lint-free paper towel.
- Reinsert the damper into its slot, pressing down until it clicks into place. Repeat for the other colors.
- Plug in the printer and run a single printhead cleaning cycle via the driver utility to clear any minor air pockets left in the nozzles.
For more detailed step-by-step instructions on connecting your device to the local network after hardware servicing, check out our guide on choosing the best Epson EcoTank printer for cost efficiency or resolve other interface issues by visiting our guide on fixing HP printer offline errors in Windows.
Step 2: Cleaning Oxidized Printhead and Cartridge Contacts
If the electrical signals from the logic board cannot reach the printhead due to dirt or oxidation, the nozzles will not fire.
- Remove the ink cartridges or printhead assembly from the carriage.
- Locate the gold-colored copper contacts on the back of the cartridge and the matching pins inside the carriage holder.
- Dampen a lint-free microfiber cloth or a cotton swab with 99.8% pure isopropyl alcohol. Do not use tap water or rubbing alcohol containing additives, as they leave mineral deposits or cause corrosion.
- Gently wipe the gold contact pads to remove grease, oxidation, or ink splatters.
- If there is stubborn corrosion, use a soft white pencil eraser to gently polish the contact pads, then wipe away any residue.
- Allow the contacts to dry completely for about 3 minutes, then reinstall the cartridges.
Step 3: Adjusting Windows Driver Settings
If the printer outputs a perfect internal test page (nozzle check) but prints blank sheets from your computer, the driver is likely sending corrupted page description commands.
- In Windows, open the Control Panel and select Devices and Printers.
- Right-click your printer icon and select Printer Properties.
- Go to the Advanced tab and locate the option labeled "Enable advanced printing features". Try unchecking this box, then click Apply. This forces Windows to render layouts in a basic raster format, bypassing driver rendering conflicts.
- Ensure the printer is not routing through a generic WSD port. Check the Ports tab, and if necessary, configure a Standard TCP/IP port using the printer's local IP address.
Preventative maintenance for domestic inkjet printers
To avoid future physical blockages in the printhead nozzles and extend the overall lifespan of your printer components, it is highly recommended to print a test page containing all primary colors at least once a week. This routine forces fresh ink to flow through the internal delivery lines and clears any dried residue from the nozzle plate, preventing crystallization due to prolonged inactivity. Additionally, keeping the printer away from direct drafts and heat sources reduces the rate of solvent evaporation inside the ink chambers.
Frequently Asked Questions (FAQ)
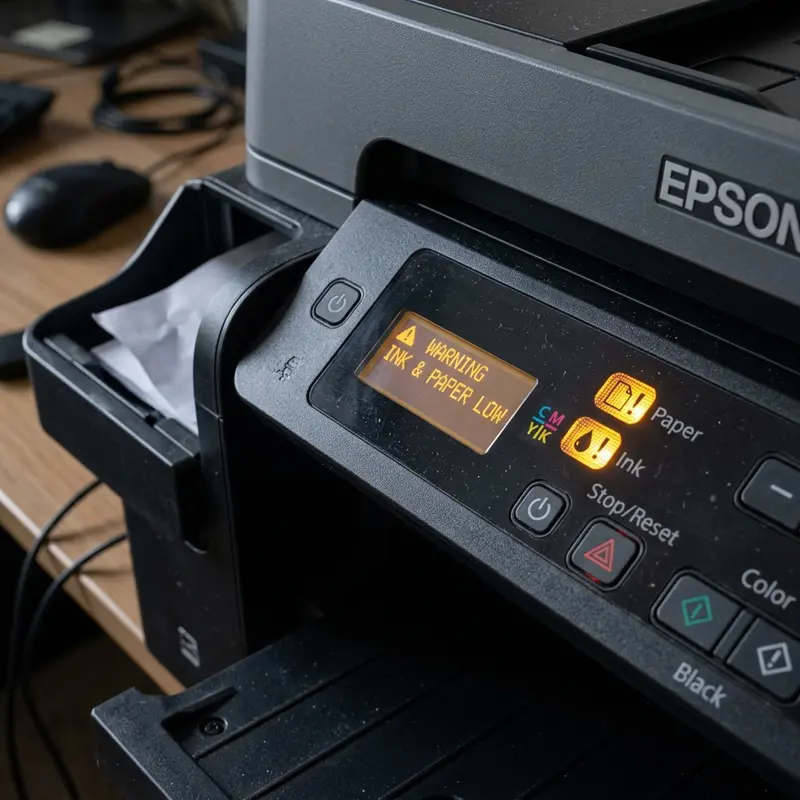
1. Why is my printer printing blank pages when I just refilled the ink tanks?
Refilling the external tanks does not automatically fill the internal ink tubes and dampers if they have run dry. Air becomes trapped in the supply lines (airlock). You must manually draw ink into the dampers using a syringe or run a "Power Ink Flushing" cycle to purge the air.
2. How many printhead cleaning cycles should I run to clear a clog?
You should run no more than 2 or 3 consecutive cleaning cycles. If the print quality does not improve, running additional cycles will only waste ink, fill up the waste ink maintenance box, and potentially overheat thermal printhead resistors. Let the printer sit for 2 hours to allow the fresh ink to soften the dried deposits, then try again.
3. Can I use water to clean a clogged printhead?
Do not use tap water, as it contains minerals that will clog the microscopic nozzle orifices. Distilled water can be used to clean external surfaces, but a specialized printhead cleaning solvent or 99.8% isopropyl alcohol is recommended for clearing dried ink blockages safely.
4. What is a Power Ink Flushing cycle and when should it be used?
A Power Ink Flushing (or Power Cleaning) is an intensive purge cycle that clears the entire ink system. It consumes a significant amount of ink and fills the maintenance box quickly. It should only be used if manual cleaning has failed, and the external ink tanks are at least 30% full.
5. Why is my laser printer printing completely blank pages?
Laser printers do not use liquid ink, so they do not suffer from clogged nozzles. A completely blank page from a laser printer is almost always an electrical issue, such as a lack of high-voltage transfer bias to pull toner onto the paper, a faulty OPC drum ground, or a stuck physical laser shutter.
6. How do I know if my printhead is burnt out and needs replacement?
If you have manually purged the dampers, verified that ink is reaching the nozzles, cleaned the electrical contacts, and run cleaning cycles, but the printer still outputs entirely blank pages with no error messages, the printhead's internal electronics have likely suffered a short circuit or thermal failure. The printhead will need to be replaced.
Validating Pump and Cap Assembly Vacuum Seals
If your printer output is completely blank despite having full ink reservoirs, the issue may lie in the mechanical capping unit (Cap Assembly) situated at the printer's service station. The rubber cap must form a hermetic seal against the face of the printhead nozzle plate. If this rubber seal has degraded, split, or is coated with dried ink sludge, the peristaltic pump will draw air instead of ink, failing to generate the negative pressure needed to pull ink from the reservoir cartridges. Cleaning the rubber caps with a lint-free swab soaked in warm demineralized water restores the vacuum seal, enabling the pump to clear the nozzles and resolve the blank page printing issue.


