How to Flush and Remove Air from Epson L3250 Ink Tubes: Step-by-Step
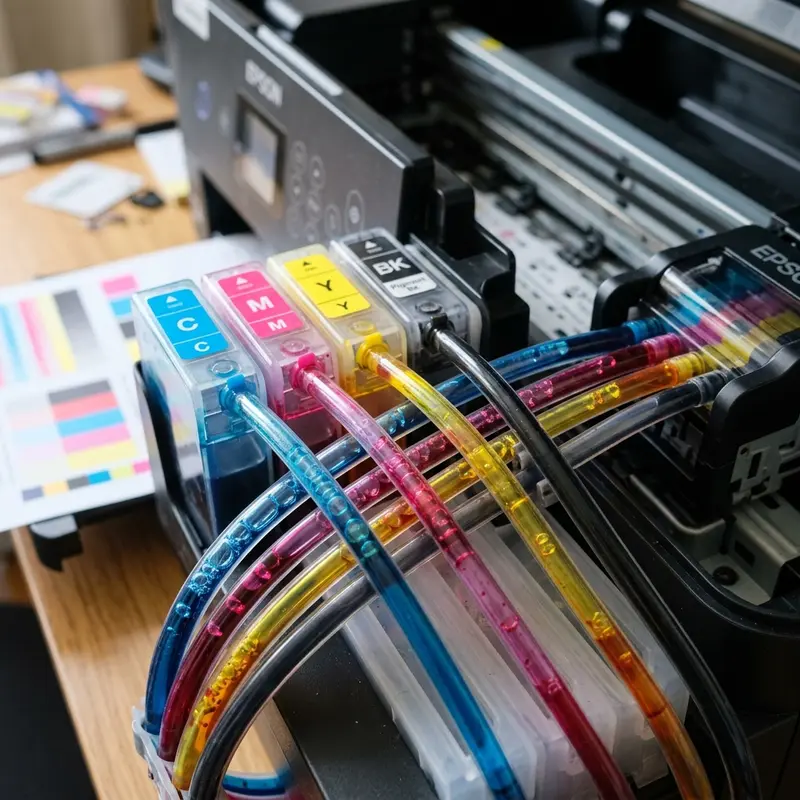
The Epson EcoTank L3250 relies on a Continuous Ink Supply System (CISS) that uses hydrostatic pressure to deliver ink from external reservoirs to the printhead. However, the stability of this ink feed system depends on maintaining a pressure seal. If the printer remains unused for long periods, or if the ink levels in the reservoirs fall below the minimum limit, air can enter the lines. These air bubbles migrate through the flexible silicone tubing and accumulate inside the printhead dampers (small ink reservoirs mounted on the carriage), blocking ink from entering the printhead nozzles. To remove air from the Epson L3250 ink tubes, perform a Power Cleaning cycle through the printer preferences utility on your computer, or manually draw ink and air out using a syringe connected directly to the ink dampers under the printer scanner unit.
In this technical maintenance guide, we will analyze the fluid physics behind the Epson L3250 ink delivery system and explain why the piezoelectric printhead fails when air is present (due to the compressibility of gases). We will cover the two primary methods for removing air from the tubing: the software-based Power Ink Flushing routine and the manual syringe purging method (ideal for dry lines). For other troubleshooting guides, see our articles on fixing flashing paper and ink lights on the Epson L3250 or how to connect your Epson L3250 to Wi-Fi using your mobile device.
1. The Physics of Air Gaps in a Piezoelectric Printhead
Unlike thermal inkjet systems that boil ink to create vapor bubbles that force ink droplets out of the nozzles, Epson printheads use proprietary MicroPiezo technology. This system relies on physical deformation. The walls of the ink chambers in the printhead are lined with piezoelectric ceramic crystals that deform mechanically when exposed to high-frequency electrical pulses (ranging from 36V to 42V).
Liquid ink is practically incompressibility. When the piezo crystal flexes the chamber wall, it generates a high-pressure shockwave that forces a droplet of ink through the microscopic nozzle plate. However, when air bubbles enter the damper and printhead chamber, the system's physics change:
- Gas Compressibility: Air is highly compressible compared to liquid ink. When the piezo crystal flexes to eject ink, the mechanical energy is absorbed by the air bubble compressing. As a result, no pressure shockwave reaches the nozzle, and no ink is ejected.
- Loss of Siphon Effect: The surface tension of the ink at the nozzle plate combined with the sealed chamber creates a natural vacuum (siphon effect) that pulls ink from the tanks as droplets are fired. An air bubble breaks this surface tension, halting the continuous flow of ink.
- Print Head Failure: Even though the printhead's electronics are functioning correctly, the nozzles blocked by air will fail to print, leading to blank lines or missing colors on the page.
2. Method 1: Software-Based Power Ink Flushing
Power Ink Flushing is a firmware-level utility built into the Epson L3250. This routine runs the peristaltic pump at high speed for 5 to 10 minutes, generating a strong vacuum at the cap station to draw ink from the reservoirs to the printhead. This method is suitable for removing small air gaps (less than 2 inches in length) from the tubing.
System Requirements: Before starting, verify that all ink reservoirs are filled above the 1/3 (one-third) line. Running a Power Ink Flushing cycle with empty tanks will pull more air into the lines and printhead, which can damage the piezo crystals due to a lack of liquid cooling.
Step-by-Step Instructions (Windows):
- Connect your Epson L3250 to your computer using a USB cable. Ensure no print jobs are pending in the print queue.
- Open the Control Panel, select Devices and Printers, right-click the Epson L3250 icon, and select Printing Preferences.
- Navigate to the Maintenance tab and click on the Power Ink Flushing button.
- Review the on-screen warning regarding ink consumption and waste pad saturation, then proceed.
- The printer will begin a noisy mechanical process, during which the power LED will blink. Do not turn off the printer or disconnect the power cable during the cycle, as this can interrupt the alignment process and lock the logic board.
- Once the process is complete, run a nozzle check pattern to verify if the missing colors have been restored.
3. Method 2: Manual Damper Purging with a Syringe
When the ink lines are completely empty or if the Power Ink Flushing cycle fails to resolve the issue, manual syringe purging is the most effective solution. This method involves removing the dampers from the carriage and using a syringe to pull ink from the reservoirs, filling both the tubing and dampers under negative pressure.
Required Tools:
- 4 clean, needleless plastic syringes (10 ml or 20 ml);
- A small Philips-head screwdriver;
- Paper towels or clean cloths (to catch ink drips);
- Disposable gloves.
Step-by-Step Instructions:
- Unlock the Print Carriage: Power down the printer and open the top access cover. The carriage will be locked in its home station on the far right. Use a small Philips screwdriver to rotate the white plastic gear on the left side of the capping station counter-clockwise. This releases the carriage lock. Slide the carriage manually to the center of the track.
- Remove the Carriage Cover: Locate and remove the single screw holding the black plastic cover over the dampers. Gently press the release tab at the back and lift the cover off the carriage.
- Extract the Empty Damper: Identify the color channel containing the air gap. Press the plastic release tab on the front of the damper and pull it straight up out of its slot in the printhead assembly. Avoid twisting or pulling on the silicone tubes.
- Perform the Purge: Insert the tip of a clean syringe directly into the damper's lower outlet valve (the grey rubber seal that sits on the printhead intake needles). Pull the syringe plunger back slowly. You will see air pull through the tubing, followed by ink. Continue pulling until the damper is 90% to 95% full of ink and free of large air bubbles.
- Clean and Reinstall: Carefully remove the syringe. Wipe the damper's outlet valve with a clean paper towel to remove residual ink, then slide the damper back into its slot in the carriage, pressing down until it clicks into place. Repeat this process for other colors if needed.
- Reassemble and Test: Replace the plastic carriage cover and secure it with the screw. Move the carriage back to the right-hand home position and turn on the printer. Run a standard head cleaning cycle via the printer software to stabilize the pressure and run a nozzle check.
| Process Parameter | Method 1: Power Ink Flushing (Software) | Method 2: Manual Purging (Syringe) |
|---|---|---|
| Ink Consumption | Very High (uses approximately 10% to 15% of the total tank volume) | Very Low (ink drawn into the syringe can be returned to the reservoir) |
| Waste Pad Impact | Rapidly increases the internal EEPROM waste ink pad counter | None (no waste ink is sent to the internal waste pads) |
| Technical Difficulty | None (completed with a few clicks in the printer software) | Moderate (requires physical disassembly and tool handling) |
| Printhead Risk | Low (risk only if run with empty tanks, causing thermal stress) | Moderate (requires care to avoid damaging the damper diaphragm) |
4. Critical Safety Instructions and Common Mistakes
When performing physical maintenance on the ink lines of your Epson L3250, pay close attention to these safety guidelines to prevent permanent hardware damage:
Do Not Force Ink Back into the Damper: When pulling ink out of a damper with a syringe, the only movement allowed is suction (pulling the plunger). If you push the plunger, the resulting hydrostatic pressure will rupture the thin, flexible plastic film diaphragm on the side of the damper. This will destroy the damper and cause ink to leak onto the printhead contact pins, which can lead to electrical shorts.
Avoid Cross-Contamination of Colors: Use a separate, clean syringe for each color channel. If you must reuse a single syringe, wash it thoroughly with warm distilled water and dry it completely before using it on a different color. Even a small amount of cross-contamination (e.g., magenta ink entering the yellow damper) will affect color accuracy.
Monitor Ink Levels Regularly: Air enters the lines because the reservoirs are allowed to run completely dry. Check the transparent ink level windows on the front of the printer weekly. Refill the reservoirs whenever the ink level drops near the lower limit line.
5. Maintaining Your Ink Delivery System
Removing air from your Epson L3250's ink lines is an essential maintenance task. If you print regularly and notice small air gaps, a software-based Power Ink Flushing cycle is usually enough to resolve the issue. However, if the printer has been sitting idle for months and the lines are dry, manual syringe purging is the most efficient and cost-effective approach. It saves ink, prevents waste pad wear, and protects the printhead from thermal stress.
By keeping the ink lines filled and refilling the reservoirs before they empty, you will maintain the proper pressure balance inside your EcoTank printer, ensuring clean, high-quality prints for years to come.
Advanced Hardware Diagnostics and Preventative Maintenance for Epson L3250 / L4260
To preserve the mechanical reliability and print output quality of your Epson EcoTank printer, it is vital to monitor the structural components of the MicroPiezo printhead assembly and carriage assembly. Epson printheads utilize piezoelectric crystals that physically bend when subjected to electrical pulses. This deflection ejects ink drops with high precision without relying on heat. In contrast to thermal inkjet heads, which boil the ink, piezoelectric heads run at room temperature, which lowers thermal stress on the printhead nozzle plate. However, this configuration is highly vulnerable to micro-air bubbles and dried pigment residues clogging the channels.
| Mechanical Part | Primary Function | Common Failure Mode | Recommended Repair Procedure |
|---|---|---|---|
| Capping Station | Seals the printhead when idle; provides a vacuum seal for ink priming during purge cycles. | Rubber gasket degradation or ink crust buildup preventing airtight vacuum. | Gently clean the rubber gasket rim with a lint-free cotton swab moistened with distilled water. |
| Wiper Blade | Physically wipes the lower surface of the printhead nozzle plate to clear excess ink. | Paper dust accumulation combined with dry ink scratching the printhead surface. | Remove solid fibers using precision tweezers and apply printhead cleaning solution. |
| Pressure Dampers | Regulate ink pressure from external reservoirs and prevent air pocket movement. | Damper chamber drying out or emptying due to lack of ink pressure or bad ink viscosity. | Manually prime the damper using a syringe (without needle) connected to the damper valve to extract trapped air. |
| Linear Encoder Strip | Provides optical positioning reference for the carriage motor as it travels horizontally. | Lubricant grease or ink mist contamination on the strip, causing misaligned print lines or error codes. | Carefully wipe the strip horizontally with isopropyl alcohol and a clean microfiber cloth. |
To avoid damaging the power transistors on the motherboard of the Epson L3250 or L4260, never detach the internal ribbon cables while the printer is plugged in. If printhead ink leaks onto the electronic pin contacts, it can cause a short circuit that blows the driver chips (such as the F1 fuse or the main IC transistors), causing the printer to stop booting or display persistent double-blinking light errors. Maintaining these printers requires precision tools, anti-static safety gear, and patience during cleaning. For other technical maintenance issues, you can check our guide on how to connect the Epson L3250 printer to Wi-Fi from your phone.
Frequently Asked Questions
How often does air enter the Epson L3250 ink lines?
Under normal operating conditions, air should not enter the lines. This issue typically occurs if the printer is left unused for more than 30 to 60 days (which can cause ink at the nozzles to dry out, letting air leak in) or if the ink reservoirs are allowed to run completely dry.
Can I return the ink drawn into the syringe back to the printer?
Yes. If the syringe you used was completely clean, dry, and free of dust or ink from other colors, you can pour the collected ink back into the corresponding reservoir to prevent waste.
Why is cyan not printing even after I removed the air from the lines?
If the lines and dampers are filled with ink but a color is still missing from your test prints, the nozzles on the printhead may be clogged with dried ink. You may need to clean the printhead nozzles physically using a specialized printhead cleaning solvent and lint-free wipes.
Does Power Ink Flushing consume a lot of ink?
Yes. A Power Ink Flushing cycle consumes about 10% to 15% of the printer's total ink capacity. Because it pumps a large volume of ink directly into the waste pads, it should only be used as a last resort.


