How to Clean Cliff Sensors on a Multilaser Robot Vacuum: Step-by-Step
Robot vacuums from Multilaser (such as the popular Hydra, Orion, and Delta models) are known for their excellent cost-benefit ratio, but they require regular maintenance of their optical components to prevent errors and falls. To clean the cliff sensors on a Multilaser robot vacuum, place the device upside down with the power switch turned off, locate the three or four transparent plastic windows along the bottom edges, and wipe them gently with a dry cotton swab or a clean microfiber cloth to remove accumulated dust that obstructs the infrared light beams. If these windows are blocked by fine dust or pet hair, the vacuum will stop working and emit warning beeps.
Dust accumulation on sensor lenses is the primary cause of stalling in budget-friendly vacuums. When the sensor is blocked, the control software interprets that the device is at the edge of a step, stopping forward motion or causing it to spin in circles. In this technical guide, we will explain the physical principles of infrared sensors, provide a step-by-step cleaning process, address common error code beeps, and explain what to do if your vacuum struggles on dark floors. We will also look at multimeter electrical checks and mechanical calibrations that prevent falls.
1. How Infrared Cliff Sensors Work
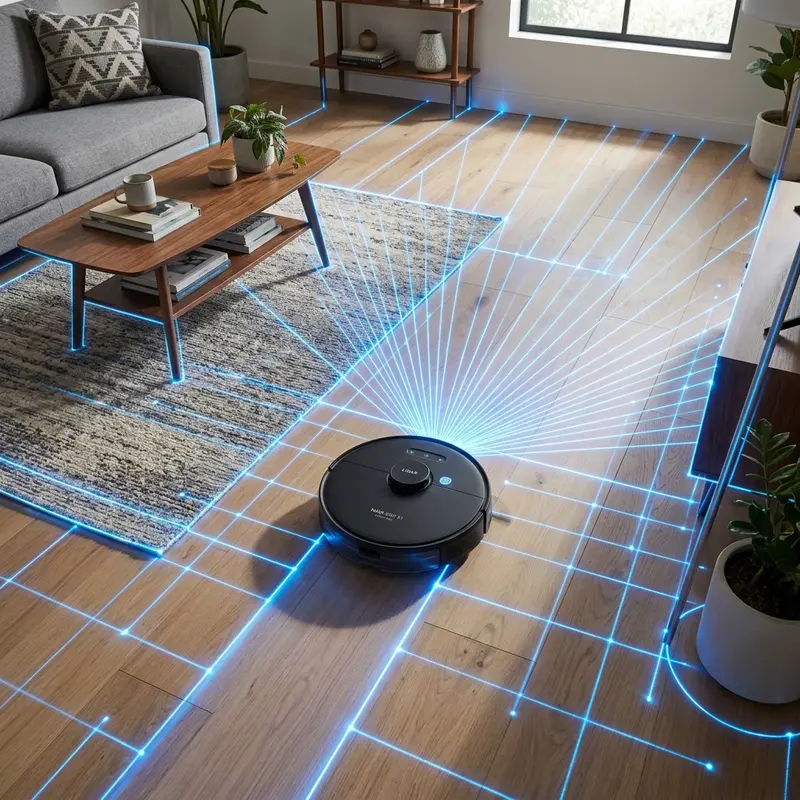
Cliff sensors function using an infrared optical pair containing an emitter (infrared LED) and a receiver (photodiode). The emitter projects an invisible beam of light toward the floor. This light bounces off the floor and reflects back to the receiver, which measures the return time or light intensity (using Time of Flight or optical triangulation). The signal processing board converts this analogue light reflection into a digital value. If this value drops below a pre-programmed threshold, the logic board registers a hazard.
When the vacuum reaches the edge of a stair or step, the emitted infrared light travels into the empty space below and does not return to the receiver. The lack of reflected light tells the motherboard that there is a drop-off ahead. The microprocessor then signals the wheel motors to reverse, backing the robot away from the edge. This constant pinging occurs dozens of times per second, ensuring the vacuum can react even when travelling at its maximum speed across different rooms.
To understand the integration of smart appliances in IoT systems, check our guide on how to connect robot vacuum to Smart Life app for app-based sensor settings.
2. Recommended Materials for Optical Sensor Maintenance
To clean the plastic sensor lenses without scratching their surfaces (which causes light diffraction and permanent reading errors), avoid abrasive chemicals, common rubbing alcohol, or rough cloths. Scratching the soft acrylic covers of the sensors ruins their optical clarity, diffusing the infrared light and causing false positive fall warnings even on clean floors.
Use only these technical materials:
- Soft Cotton Swabs: Ideal for reaching the small crevices of the sensors without applying excessive mechanical pressure. Using cotton swabs prevents physical strain on the mounting brackets inside the chassis.
- Clean Microfiber Cloth: The same type used to clean eyeglasses or camera lenses, free of lint and abrasive dust. Microfiber locks dust particles inside its fibers rather than dragging them across the lens.
- Isopropyl Alcohol (Above 99%): If sticky residue is present, moisten the cotton swab slightly. Isopropyl alcohol contains no water and evaporates without leaving conductive residues, protecting the internal boards from corrosion.
- Soft Bristle Brush: Useful for sweeping away dust around the sensor slots before wiping them, preventing loose dirt from falling into the sensor housing.
3. Step-by-Step Guide to Cleaning Multilaser Sensors
Follow this procedure to prevent electrostatic discharges or mechanical damage to the mainboard during cleaning. Make sure you work in a clean, dry area free of moisture:
- Turn Off the Device: Remove the Multilaser vacuum from its charger. Turn off the physical power switch on the side of the chassis to cut electrical current to the sensors, preventing short circuits during handling.
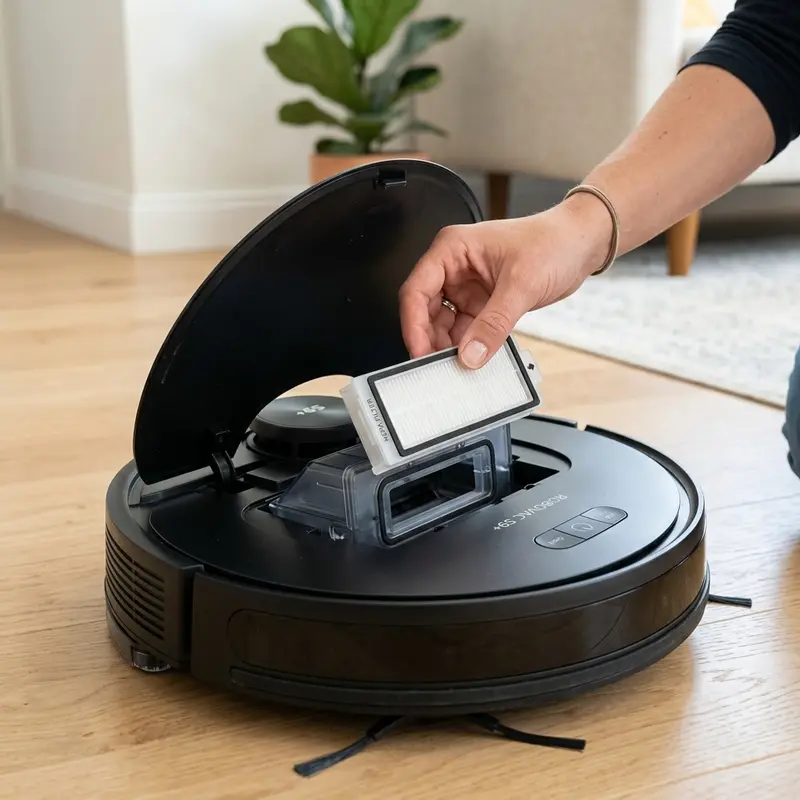
- Position the Chassis: Place a soft towel on a flat surface and lay the vacuum upside down to avoid scratching the top face or damaging the laser dome if your model has one.
- Locate the Sensor Windows: Identify the cliff sensors. On Multilaser models, they are distributed along the front and side margins: one near the front caster wheel and two near the drive wheels.
- Remove Loose Dust: Use your soft brush to sweep away loose dirt, cobwebs, and pet hair from the sensor window openings. Focus on the gaps between the chassis and the plastic windows.
- Wipe the Lenses: Gently rub the dry cotton swab or microfiber cloth over the transparent windows in circular motions until the plastic is clear. If grease is present, apply a single drop of isopropyl alcohol to the cotton swab first.
- Inspect Your Work: Use your phone's flashlight to verify that no lint or smudge remains. Inspect the lenses from multiple angles. Flip the vacuum back over and turn the power switch back on.
4. Troubleshooting: Decodifying Multilaser Error Beeps
If the Multilaser vacuum continues to beep and refuses to move after cleaning, the motherboard is registering a sensor or wheel error. Multilaser vacuums use repetitive sound signals to notify the user of the issue. The number of sequential beeps tells you exactly what part of the system is failing, allowing you to bypass trial-and-error diagnostics.
Here are the common acoustic alerts related to sensors and wheels:
- 2 Beeps (Bumper Error): The mechanical bumper is stuck or blocked by dirt. Clean the bumper gaps and press it gently to ensure it springs back into place. A stuck bumper makes the software assume a wall is constantly present, blocking all movement commands.
- 3 Beeps (Cliff Sensor Error): The cliff sensors are still reporting a drop-off or calibration error. Check for smudges or check if the device was started on a very dark floor or in deep shadows that absorb the light signal.
- 4 Beeps (Wheel or Low Battery Error): The drive wheels are suspended or tangled with hair and strings. Clean the wheel axles and charge the battery fully. When the wheels are suspended, the internal switches assume the robot is stuck over an obstacle.
For home owners seeking info on coexisting with pets, check our guide on are robot vacuums safe for pets and cats to understand how pets interact with sensors.
5. The Dark Floor Dilemma (False Drop-Off Detection)
A physical phenomenon affecting infrared cliff sensors is their erratic behavior on dark floors, black tiles, or dark rugs. The infrared light emitted by the sensor is absorbed by dark surfaces instead of reflecting back to the photodiode receiver. This absorption happens because dark pigments trap light waves in the infrared spectrum, leaving the receiver photodiode without enough reflected signal. The vacuum interprets this absorption as a drop-off, stopping and emitting a cliff sensor error.
If you have no stairs in your home, you can bypass this issue by covering the transparent windows with white tape or paper to reflect the infrared light continuously. To do this with technical accuracy, cut small rectangles of matte white cardstock and tape them over the sensor lenses using clear adhesive tape. This setup forces the infrared light to reflect off the white paper back into the receiver, tricking the motherboard into registering a flat floor. Keep in mind that this disables the vacuum's ability to detect actual stairs, so you must block physical access to balconies and steps using physical barriers.
6. Multilaser Cliff Sensor Troubleshooting Matrix
The table below summarizes common sensor issues, their causes, and suggested solutions:
| Symptom | Likely Cause | Recommended Action |
|---|---|---|
| Backs up and stops | Dust blocking one of the side sensors. | Clean all three transparent windows with a dry swab. |
| Stops on dark carpets | Infrared absorption by dark flooring colors. | Bypass sensors with white tape (only if no stairs exist). |
| 3 repeating beeps | Damaged photodiode or sensor module failure. | Replace the sensor assembly soldered to the logic board. |
| Falls down stairs | Scratched lenses or sensor blocked with reflective tape. | Remove tape obstructions and clean/polish the lenses. |
7. Preventive Maintenance and Cleaning Frequency
To keep your Multilaser vacuum running efficiently, do not wait for error beeps to clean its sensors. Establish a regular maintenance routine based on your home environment and usage patterns:
- # No Pets: Clean the transparent cliff sensor windows once every 15 days. Clean the side brushes and wheels during the same session to ensure no hairs wrap around the brush gear drives.
- # With Pets: Pet dander and fine hairs accumulate quickly under the chassis due to static charge. Clean the sensors weekly. Pet dander acts like a magnet for static dust, forming a thick grey layer over the lenses within a few runs.
- # After Sweeping Sticky Spots: If the vacuum sweeps over sticky residues, inspect the lenses immediately. Sticky film distorts light, causing reading errors. Wipe the residue using isopropyl alcohol to dissolve grease.
8. Electrical Faults vs. Dirt: Diagnostic Checks with a Multimeter
If cleaning the lenses does not clear the 3-beep error, the issue may be an electrical breakdown of the infrared LED or photodiode. Over time, the solder joints holding the sensors onto the lower wiring harness can develop micro-fractures due to the vibrations of the vacuum traversing tile grout lines. To check the sensor integrity, you can perform a continuity and voltage test using a multimeter set to Direct Current (DC) mode. Turn the power switch on and measure the voltage across the emitter LED terminals, which should read between 1.2V and 1.5V.
If the voltage is correct but no infrared light is emitted, the LED itself is dead. Since infrared light is invisible to the human eye, you can check if the emitter is working by looking at it through the camera app of your smartphone. Most phone cameras do not have infrared filters on their lenses, allowing you to see a pale purple glow coming from the functioning emitter LED. If no glow is visible, the wiring harness or the sensor board must be replaced.
9. Preventative Hardware Solutions for Homes with Stairs
Relying solely on the cliff sensors to protect your vacuum from falling down stairs is a calculated risk, especially if your stairs lead directly to tiled floors. To add a layer of physical safety, you can install physical barriers. Placing a low wooden threshold or a decorative strip at the top of the stairs acts as a physical bumper trigger. If the sensors fail, the mechanical bumper will hit the threshold first, forcing the vacuum to turn back.
Additionally, for vacuums with mapping capabilities, always configure virtual no-go zones along the exact coordinates of the staircase. This dual-layer protection—combining optical cliff sensors with digital boundaries and physical thresholds—ensures that even if dust blocks the lenses mid-clean, your vacuum remains safe from catastrophic drops.
Frequently Asked Questions
How do I know if a cliff sensor is burned out?
If the vacuum continues to emit 3 beeps on light-colored floors after thorough cleaning, the photodiode or emitter LED might be burned out, requiring replacement of the sensor board.
Can I use gel alcohol or sanitizers to clean the sensors?
No. These products contain water and additives that can leave a cloudy film on the plastic windows or seep into the circuits. Use only 99% isopropyl alcohol or a dry cloth.
Will my Multilaser vacuum fall down stairs if sensors are dirty?
Usually no. Accumulated dust blocks light reflection, making the vacuum assume a drop-off is present, which causes it to stop for safety. Real falls typically happen if the sensors are covered with reflective tape.
Why is my Multilaser vacuum spinning in circles?
This is usually caused by a dirty side cliff sensor or hair tangled in a drive wheel. Cleaning all sensors and clearing hair from wheel axles should resolve the issue.


