Canon G3110 Not Printing with Empty Ink Tubes: Full Fix Guide
Continuous Ink Supply System (CISS) printers have revolutionized high-volume printing by shifting the financial paradigm away from expensive disposable ink cartridges. The Canon MegaTank G3110 is a highly regarded member of this class, celebrated for its reliable color accuracy and solid mechanical design. However, like many refillable printers, it is susceptible to a frustrating mechanical issue: the printer outputs completely blank pages, certain colors fail to deposit, or the internal silicone ink delivery tubes appear filled with large air pockets instead of fluid. To resolve the issue of a Canon G3110 not printing because of empty ink tubes, you should run the built-in electronic System Cleaning procedure via the printer driver interface or perform a manual siphon pressurization using a syringe to draw ink directly through the lines and clear trapped air bubbles.
Ignoring empty ink tubes for extended periods can cause permanent damage to the microscopic heaters inside the printheads, eventually requiring a costly physical replacement of the black (BH-7) or color (CH-7) cartridges. In this technical guide, we will analyze the fluid dynamics that govern the MegaTank system, discuss the physics of thermal printhead failures, and provide step-by-step procedures for both software-driven maintenance and manual hardware intervention. If you are also managing other print systems in your workspace, you may find it useful to read our guide on running Epson L3250 printhead cleaning from a PC to keep your fleet in top operating condition.
1. The Physics of Fluid Dynamics in the Canon MegaTank CISS
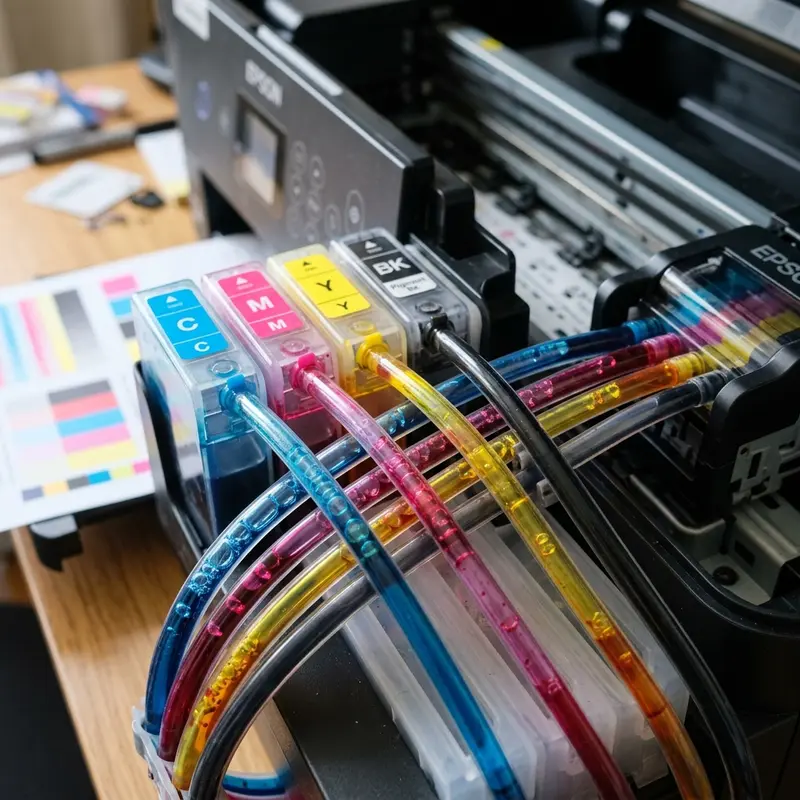
To diagnose why ink retracts from the delivery lines, we must explore the mechanical architecture of the Canon CISS. The system relies on a passive hydrostatic balance. Ink sits in high-capacity external reservoirs and flows through flexible silicone tubes to the printhead carriage. The carriage contains dampers (acting as secondary ink reservoirs and pressure regulators) that sit directly above the printheads. When the printhead ejects ink, a negative pressure gradient is created inside the damper, drawing new ink from the main reservoir through capillary action.
The main ink tanks are split into two physical chambers: the primary ink storage area and an atmospheric equalization chamber. When you open the tank cap to refill the ink, the pressure inside the reservoir equalizes with the outside air. To prevent ink from flowing backward when the printer is idle, the system utilizes a physical pinch-valve mechanism linked to the blue plastic access covers on the printhead carriage. When these blue covers are raised, a roller assembly physically compresses the silicone tubes, blocking the fluid path and stopping ink movement.
Air bubbles and ink retraction occur due to tiny seal leaks at the printhead junction, leaving the ink tank caps open, or moving the printer without engaging the ink valve switch. Because air is highly compressible, any air pocket that enters the lines will absorb the negative pressure created during printhead firing. Instead of drawing ink from the reservoir, the air pocket simply expands and contracts. This starves the printhead nozzles of ink, causing the thermal heaters to fire dry, which can lead to rapid thermal stress and mechanical breakdown.
2. FINE Thermal Printhead Technology and the Risk of Burnout
Unlike piezoelectric printheads that use mechanical force to eject ink, Canon printers use proprietary FINE (Full-photolithography Inkjet Nozzle Engineering) thermal printheads. A FINE printhead contains thousands of microscopic nozzles, each backed by a tiny thin-film electrical resistor. To print, the logic board sends a rapid voltage pulse to the resistor, heating it to temperatures exceeding 300°C (572°F) in a fraction of a microsecond.
This intense heat boils a thin layer of the ink solvent adjacent to the resistor, creating a rapidly expanding steam bubble. The expanding bubble acts as a physical piston, forcing a droplet of ink out of the nozzle onto the page. Once the electric pulse ends, the resistor cools down, the bubble collapses, and the resulting vacuum draws a fresh volume of ink into the chamber from the damper. This cycle repeats thousands of times per second across all active nozzles.
Crucially, the ink acts as a coolant for the thermal resistors. If the delivery tubes are empty and the printhead runs dry, the electrical resistors will continue to heat up without any fluid to absorb and dissipate the thermal energy. Within a short period of dry firing, the extreme heat melts the polyimida walls of the micro-nozzle channels and burns out the metallic resistors. Once these resistors fail, the printhead is ruined and must be physically replaced, representing a significant maintenance cost.
3. Running the System Cleaning Procedure via Software
When the ink tubes contain minor air bubbles or are only partially depleted, the printer's firmware can resolve the issue using a built-in purge cycle. This cycle is known as a System Cleaning. Unlike a standard printhead cleaning, a System Cleaning runs the internal peristaltic pump for a longer period to draw a large volume of ink through the lines and restore proper pressure.
To run a System Cleaning on Windows, follow these technical steps:
- Verify the physical ink levels in the tanks. A System Cleaning consumes a large amount of ink. Make sure all tanks are filled to at least the 50% mark. Running this cycle with low ink levels will pull more air into the tubes, worsening the problem.
- Ensure the printer is powered on and connected to your laptop via a stable USB cable connection.
- Open the Windows Control Panel, select "Devices and Printers," right-click the Canon G3100 Series icon, and select "Printing Preferences."
- Navigate to the Maintenance tab and click on the "Maintenance and Preferences" tool utility.
- Select the System Cleaning option. The software will ask if you want to clean all colors or individual groups. Select "All Colors" to ensure even pressurization.
- Confirm the warning regarding ink consumption and click "Execute."
The System Cleaning process takes between 5 and 10 minutes to complete. During this time, the printer's main motor drives the peristaltic pump to apply constant vacuum suction to the bottom of the printhead capping station. You will hear rhythmic mechanical hums and pump noises. Caution: Do not power down the printer or unplug the power cord during this cycle, as doing so can corrupt the firmware cycle and leave the purge mechanism in an unparked state.
4. Advanced Manual Pressurization Using a Syringe
If the delivery tubes are completely dry, running software cleaning cycles may consume too much ink or fill the waste ink absorber pads (felt pads) prematurely, triggering a service lockout. In cases of severe despressurization, a manual hardware purge is the most efficient and reliable solution.
This procedure requires a standard 10 ml or 20 ml syringe (without a needle) and a short piece of flexible tubing or a rubber adapter that fits securely over the printer's ink inlets. Follow these steps carefully:
- Turn on the printer and lift the scanner bed to expose the printhead carriage. Wait for the carriage to move to the center position, then immediately unplug the power cable from the wall. This leaves the carriage free to slide manually along the metal guide rail.
- Locate and open the two blue locking covers on top of the printhead carriage. Lifting these covers automatically engages the physical tube locks, preventing any remaining ink from sliding back toward the tanks.
- Carefully remove the black (BH-7) and color (CH-7) printheads from their slots. Be careful not to touch the rear copper contact pads or the nozzle plate on the bottom.
- Attach the syringe and adapter to the ink inlet port on the carriage (where the printhead connects to the ink feed lines). The black port is on the left, and the three color ports are on the right.
- Close the blue carriage cover for the color you are working on to release the tube lock. Slowly pull the syringe plunger to draw ink through the silicone tube until the line is completely filled and ink begins to enter the syringe.
- Before removing the syringe, open the blue carriage cover to engage the tube lock again. Detach the syringe, discard the drawn ink, and clean any residue with lint-free paper. Repeat this process for each empty ink tube.
Once all lines are primed with ink, reinsert the printheads, close the blue covers, and press down the two blue lock buttons on top of the covers to lock the printhead assembly back into place. Reconnect the power cable and print a nozzle check pattern to verify performance.
5. Comparison of Purge and Pressurization Methods
The following table outlines the different troubleshooting methods, highlighting their difficulty, resource consumption, and impact on hardware longevity.
| Troubleshooting Method | Technical Indication | Difficulty Level | Hardware & Ink Impact |
|---|---|---|---|
| Standard Head Cleaning | Minor print quality lines or small isolated air bubbles near the dampers. | Low (Driver click) | Minimal ink consumption; negligible waste pad impact. |
| System Cleaning (Software) | Partially empty ink tubes (less than 50% empty space). | Medium (Runs for 10 minutes) | High ink consumption (20-30%); fills the waste ink absorber pad quickly. |
| Manual Priming (Syringe) | Completely empty delivery tubes or persistent software-clearing failure. | High (Requires manual disassembly) | Zero waste ink pad impact; restores flow instantly without system-lock risks. |
6. Long-Term Preventative Maintenance for MegaTank Printers
To avoid ink retraction and air locks in the future, you must establish a regular maintenance routine. Because continuous ink systems rely on physical pressure balance, keeping the tubes primed is much easier than fixing them after they drain. If you manage multiple devices or face issues with other models, you can also consult our guide on resetting a locked HP DeskJet 2776 printer to expand your hardware repair skills.
First, print a color document at least once every 7 to 10 days. This exercises the thermal nozzles, keeps the dampers primed, and prevents ink from drying at the nozzle tips, which can block ink flow and cause air to back up into the lines. Second, monitor your ink levels regularly and refill the tanks before they drop below the 50% mark. Keeping the reservoirs full maintains hydrostatic pressure in the lines.
Lastly, always use the physical ink valve lock before moving or shipping the printer. When engaged, this lock pinches the tubes mechanically, preventing ink from flowing back into the tanks when the machine is tilted. By adhering to these technical guidelines, you can ensure your Canon G3110 remains highly reliable and delivers clean prints for years to come.
Frequently Asked Questions (FAQ)
Can I run multiple System Cleaning cycles back-to-back?
No, you should never run more than one System Cleaning cycle within a 24-hour period. This process consumes up to 30% of the printer's total ink volume and deposits it directly onto the internal waste ink absorber pads. Running it multiple times in a row will saturate these pads, triggering an automatic safety lockout error that requires physical pad replacement and a logic board counter reset.
Why does my Canon G3110 print blank pages even when the ink tubes are full?
If the tubes are full but the page remains blank, the nozzles on your printhead (BH-7 for black or CH-7 for color) are likely clogged with dried ink residue, or the printhead's thermal resistors have burned out. Try cleaning the printhead nozzle plate gently with warm demineralized water and a lint-free wipe, or replace the printhead if the problem persists.
What is the function of the blue levers on the G3110 printhead carriage?
The blue levers secure the printheads in the carriage and double as physical valves for the ink lines. Lifting the levers pinches the silicone tubes to prevent ink from draining back into the reservoirs while the printheads are removed. Lowering the levers opens the valves, restoring the flow of ink for normal printing.


