How to Setup a Monitor Arm Reinforcement Plate on a Glass Desktop Safely
Installing a monitor arm reinforcement plate on a glass desktop requires precision and safety to ensure stability and ergonomics.
Understanding Glass Desktop Limitations
Glass desks typically lack the structural integrity needed to support heavy equipment without reinforcement. A minimum thickness of 10mm is recommended for optimal safety.
Choosing the Right Monitor Arm
Monitor arms vary in weight capacity and adjustment features; selecting one that matches the monitor's weight is crucial. Brands like Ergotron and Vivo offer adjustable arms with capacities ranging from 10 to 40 pounds.
Materials for Reinforcement Plates
Reinforcement plates are typically made from steel or aluminum, which offer durability and resistance to bending under load. Steel plates provide superior strength but add more weight.
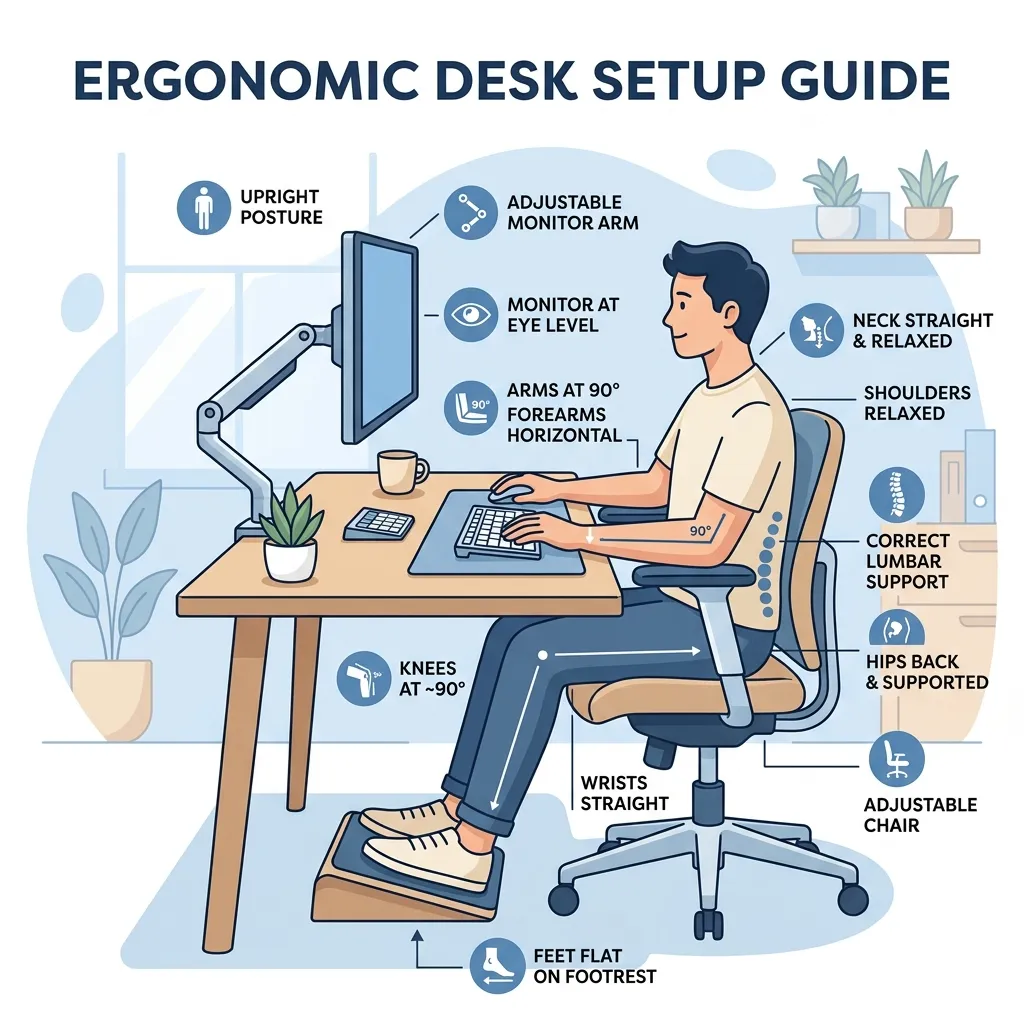
Ergonomic Considerations
Proper height adjustment of the monitor arm promotes better posture, reducing strain on the neck and eyes. Following guidelines for monitor height enhances productivity and comfort.
Installation Safety Tips
Using adhesive pads specifically designed for glass can help secure the reinforcement plate without damaging the surface. Ensure the adhesive is rated for the weight of the monitor arm and monitor to prevent accidents.
| Brand | Weight Capacity | Material | Price Range | Adjustability |
|---|---|---|---|---|
| Ergotron | 10-40 lbs | Aluminum | $200-$300 | Full motion |
| Vivo | 10-33 lbs | Steel | $50-$100 | Articulating |
| AmazonBasics | 10-25 lbs | Steel | $30-$50 | Standard adjustment |
DomineTec Tip: Ensure the monitor is positioned at least an arm's length away to reduce eye strain and enhance focus.
- Measure the thickness of the glass desktop to ensure compatibility with the reinforcement plate.
- Select a monitor arm with a weight capacity that exceeds your monitor's weight.
- Purchase a reinforcement plate made of durable material, such as steel or aluminum.
- Use adhesive pads or clamps designed for glass to secure the plate without damaging the surface.
- Adjust the monitor height to maintain ergonomic posture and reduce strain.

For optimal typing experience, consider choosing mechanical keyboard switches that match personal preferences.
Proper setup can be further enhanced by ensuring the correct monitor height is maintained.
Assessing Weight Distribution on Glass Desktops
Before installing a monitor arm reinforcement plate, assess the weight distribution on the glass desktop. Uneven weight distribution can lead to stress points that may compromise the integrity of the glass.
Consider the weight of the monitor, the arm itself, and any additional accessories that may be attached. This evaluation helps in determining the appropriate size and type of reinforcement plate required.
Utilizing a scale to weigh the components can provide an accurate measure. Identifying the location of existing supports, such as legs or brackets, can influence where the reinforcement plate should be placed.
Proper weight distribution protects the glass and enhances the stability of the monitor setup, ensuring a safer working environment.
Preparing the Glass Surface
Preparing the glass surface is essential for ensuring the reinforcement plate adheres properly. Start by cleaning the area where the plate will be installed to remove any dust or grease.
Use a glass cleaner and a lint-free cloth to wipe the surface thoroughly. This preparation helps create a smooth and clean foundation for the adhesive or mounting system used with the reinforcement plate.
Inspect the glass for any pre-existing cracks or chips that might affect the installation. Addressing these issues before proceeding can prevent further damage.
Once the surface is prepared, mark the exact location for the reinforcement plate to ensure accurate placement during installation.
Choosing the Right Adhesive for Reinforcement Plates
The choice of adhesive for attaching the reinforcement plate to the glass desktop is critical for ensuring a secure bond. Not all adhesives are suitable for glass, so selecting one specifically designed for this material is necessary.
Consider using epoxy or silicone adhesives known for their strength and durability. These adhesives provide a strong bond while remaining flexible enough to accommodate any minor movements of the glass.
Follow the manufacturer's instructions regarding curing times and application techniques to achieve optimal results. Proper application will ensure that the reinforcement plate remains securely attached over time.
Conducting a test bond on a small, inconspicuous area of the glass can help gauge the adhesive's effectiveness before full application.
Monitoring Long-Term Stability
After installing the monitor arm reinforcement plate, ongoing monitoring of its stability is vital. Regular checks can help identify any signs of stress or movement that may occur over time.
Inspect the areas around the reinforcement plate for any cracking or separation from the glass. This proactive approach can prevent potential accidents or failures in the setup.
Pay attention to the performance of the monitor arm itself. If adjustments become difficult or if the monitor starts to sag, it may indicate that the reinforcement plate needs to be reassessed.
Documenting any changes or issues can provide valuable insight into the long-term viability of the installation and inform future adjustments if necessary.
Alternative Mounting Solutions
While reinforcement plates are a popular choice for glass desktops, exploring alternative mounting solutions may also be beneficial. These solutions can offer different advantages depending on the workspace and equipment used.
Consider using freestanding monitor stands that do not require attachment to the glass. These stands can eliminate the need for reinforcement and provide flexibility in positioning.
Wall-mounted options may also be viable for certain spaces, allowing for a clutter-free desktop while maintaining ergonomic viewing angles. This approach can enhance both style and functionality.
Researching various mounting systems can help identify the best fit for individual needs and preferences, ensuring a safe and effective monitor setup.
Understanding Local Building Codes
Before proceeding with the installation, it is essential to understand local building codes and regulations regarding glass installations. Compliance with these codes ensures safety and legality in residential or commercial settings.
Local regulations may dictate specific requirements for glass thickness, mounting methods, and load-bearing capacities. Familiarizing oneself with these codes can prevent potential legal issues or safety hazards.
Consulting with a building inspector or professional contractor can provide clarity on any necessary permits or inspections that may be required. This step is especially important for larger setups or commercial installations.
Adhering to local building codes promotes safety and enhances the overall integrity of the workspace.
Environmental Considerations for Glass Desktops
When setting up a monitor arm reinforcement plate on a glass desktop, it's important to consider environmental factors that may affect the glass. Temperature fluctuations can cause glass to expand and contract, potentially leading to stress fractures.
Ensure that the workspace is maintained at a stable temperature to minimize these effects. Avoid placing the glass desktop in direct sunlight for extended periods, as UV exposure can weaken the adhesive over time.
Humidity levels should also be monitored, as excessive moisture can impact both the glass and the adhesive used for the reinforcement plate. Using a dehumidifier in particularly damp environments can help mitigate this risk.
By addressing these environmental considerations, one can enhance the longevity and safety of the glass desktop setup.
Testing the Reinforcement Plate's Effectiveness
Before permanently attaching the monitor arm, ensure that the reinforcement plate effectively supports the weight and stress of the monitor setup. Begin by gradually applying weight to the plate using weights or heavy objects, simulating the monitor's load while monitoring for any signs of glass stress or deformation.
Observe the area around the reinforcement plate to ensure that there are no cracks or shifts in the glass surface during the weight testing phase. Once satisfied with the test results, carefully remove the weights and prepare for the final installation of the monitor arm.
Adjusting Monitor Position for Optimal Viewing Angles
After installing the monitor arm, fine-tuning the monitor's position is essential to achieve ergonomic viewing angles and reduce eye strain. Utilize the adjustable features of the monitor arm to position the monitor at eye level.
Consider the distance between the monitor and the viewer; a distance of 20 to 30 inches is generally recommended to promote comfort and reduce fatigue during prolonged use. Make adjustments as necessary based on individual preferences and desk setups.
Maintaining the Glass Surface and Reinforcement Plate
Regular maintenance of the glass surface and reinforcement plate is essential to ensure ongoing safety and functionality. Clean the glass and plate with non-abrasive cleaners to avoid scratching and to maintain clarity.
Periodically check the integrity of the adhesive bond and the stability of the reinforcement plate, looking for any signs of wear or degradation over time. Address any issues promptly to prevent compromising the stability of the monitor setup.
Assessing Compatibility with Existing Furniture
Before installing a monitor arm reinforcement plate on a glass desktop, evaluate the compatibility of the glass surface with existing furniture elements. Consider the height and width of the desk, as well as the surrounding furniture, to ensure there is sufficient space for the monitor arm's range of motion.
Additionally, take note of the overall aesthetic and design of the furniture. The reinforcement plate and monitor arm should complement the existing decor while also providing functional support.
Another aspect to consider is the accessibility of power outlets and cable management. Ensure that the placement of the monitor arm and reinforcement plate does not obstruct any necessary connections.
Finally, confirm that the glass desktop is level and stable enough to support the additional weight of the monitor arm and reinforcement plate.
Periodic Inspection and Maintenance of the Reinforcement Setup
Once the monitor arm reinforcement plate has been installed, establish a routine for periodic inspection and maintenance. Regular checks can help identify any signs of wear or stress on the glass desktop and the reinforcement plate.
Inspect the adhesive bond regularly to confirm that it remains intact and secure. If any lifting or peeling is observed, reapply adhesive as necessary.
Additionally, monitor the weight distribution of the monitor arm and the attached display. Any changes in weight should prompt a reevaluation of the reinforcement plate's effectiveness.
Lastly, clean both the glass surface and reinforcement plate with appropriate materials to prevent buildup of dust and grime.
Understanding the Role of Load Distribution in Reinforcement
Load distribution is critical when installing a monitor arm on a glass desktop. Properly distributing weight prevents localized stress points that can lead to cracks or fractures in the glass.
Reinforcement plates play a pivotal role in spreading the weight of the monitor arm over a larger area. When selecting a reinforcement plate, consider the size and thickness of both the plate and the glass surface.
In addition to the physical properties of the reinforcement plate, the placement of the monitor arm affects load distribution. Ensuring that the arm is mounted in a position that evenly distributes weight across the reinforcement plate helps to mitigate stress on the glass.
Regularly evaluating the load distribution setup is essential for maintaining the integrity of the glass desktop. Periodically check for any signs of stress or deformation in both the glass and the reinforcement plate.
Understanding the Impact of Environmental Factors
Environmental factors can significantly affect the performance and safety of a monitor arm mounted on a glass desktop. Temperature fluctuations, humidity levels, and exposure to direct sunlight can all influence the materials involved in the setup.
Temperature changes can cause expansion and contraction of both the glass and the reinforcement plate. This movement can create additional stress points, especially if the materials are not compatible.
Humidity can also play a role in the longevity of adhesives used to secure reinforcement plates. High humidity levels can weaken adhesive bonds, leading to potential failure of the setup.
Furthermore, exposure to sunlight can cause fading or degradation of materials over time. Users should consider the placement of their glass desktop in relation to natural light sources.
Implementing Advanced Security Features for Monitor Arm Installations
When setting up a monitor arm on a glass desktop, security is a critical concern that should not be overlooked. Installing additional security features can prevent accidental dislodgment or tampering, ensuring the longevity and stability of the monitor arm setup.
One effective way to enhance security is through the use of tamper-resistant screws and locking mechanisms. These specialized fasteners are designed to resist unauthorized removal and can be particularly beneficial in shared workspaces or environments with high foot traffic.
To install tamper-resistant screws, make sure to first drill pilot holes into the reinforcement plate and the glass surface, ensuring that the holes are of the appropriate diameter for the screws. The most common types include the pin-in-head screws, which require a unique tool for removal, reducing the likelihood of accidental disassembly.
In addition to tamper-resistant hardware, consider using an anti-theft cable lock system. These can be attached to the monitor arm and secured to a fixed structure, such as the desk or nearby furniture, to provide an extra layer of protection against theft.
Periodic checks of these security features are advisable, particularly in high-traffic areas. This can include inspecting the integrity of screws and locks, as well as ensuring that the anti-theft cable has not been compromised.
Another important aspect of security is the visibility of the installation. Keeping the setup discreet can deter potential tampering or theft. This can involve the strategic placement of the monitor arm and the reinforcement plate to minimize exposure while still maintaining ergonomic functionality.
Troubleshooting Common Installation Issues with Monitor Arms on Glass Desktops
Even with meticulous planning and preparation, issues may arise during the installation of a monitor arm on a glass desktop. Understanding common problems and their solutions can save time and prevent damage to the glass surface.
One frequent issue is the failure of the adhesive bond between the reinforcement plate and the glass. This can occur if the glass surface was not sufficiently cleaned or if the adhesive was not applied correctly. To troubleshoot this, ensure that the surface is free from dust and oils by using a glass cleaner and a lint-free cloth.
After cleaning, reapply the adhesive, following the manufacturer's guidelines for application thickness and curing time. For those using epoxy-based adhesives, it’s critical to allow the recommended curing period before placing any weight on the monitor arm.
Another common problem is inadequate weight distribution, which can lead to instability. To address this, reassess the weight of the monitor and ensure that it does not exceed the capacity of both the monitor arm and the reinforcement plate.
If instability persists, consider redistributing the weight by utilizing additional reinforcement plates or adjusting the monitor arm's mounting position. It may be necessary to contact the monitor arm manufacturer for specific recommendations on load management.
Lastly, if screws or fasteners become loose over time, they can compromise the integrity of the installation. Regular maintenance checks should include tightening screws and verifying the stability of all components to ensure a safe and secure setup.
Frequently Asked Questions
What is a reinforcement plate?
A reinforcement plate is a sturdy surface mounted under a glass desktop to provide additional support for monitor arms.
How do I know if my glass desk is thick enough?
Measure the thickness; a minimum of 10mm (0.4 inches) is recommended for optimal safety and stability.
Can I install a monitor arm without a reinforcement plate?
Installation without a reinforcement plate is not recommended as it can lead to cracking or breaking of the glass surface.
What are the benefits of using a monitor arm?
Monitor arms offer improved ergonomics, adjustable heights, and increased desk space, enhancing overall work efficiency.
Are there specific adhesive pads for glass?
Yes, there are specialized adhesive pads designed explicitly for glass that provide secure attachment without causing damage.


