How to Remove and Clean Main Roller Brush on Robot Vacuum
How to Remove and Clean Main Roller Brush on Robot Vacuum
If your robot vacuum experiences a sudden drop in suction power, produces a strained motor sound, or halts with a "main brush blocked" error warning, here is the mechanical diagnosis: long hair, pet fur, and thread spools wrap around the roller body and end bearings, creating mechanical resistance that jams the nylon reduction gears. Knowing how to remove and clean the main roller brush on a robot vacuum clears the debris channel and protects the suction motor from thermal damage.
1. The Mechanical Design of hybrid Main Roller Brushes
The central roller brush on high-performance robot vacuums (such as KaBuM! Smart 700, Liectroux, Xiaomi, and Mondial Turbo series) utilizes an active scrubbing system. The roller spins at high speeds, rotating counter to the vacuum's travel path to lift dirt from carpets into the suction inlet. The assembly consists of three key components:
- Hybrid Roller Body (Bristles/Rubber): Scrubs floor surfaces and drives dirt into the suction slot. Wires and pet hair wrap around the core, requiring longitudinal cutting.
- Metal Axle and End Bearings: Provide smooth, low-noise rotation. Friction from hair spools can melt the plastic housing, requiring regular cleaning.
- Brush Guard Cover and Latches: Hold the roller in place and seal the suction channel. Clean the rubber strip monthly to maintain optimal suction.
To compare this brush assembly with entry-level and mid-range systematic models, check our guides on whether the KaBuM! Smart 500 is worth it or read our instructions on how the WAP Robot W100 worth buying manages roller brushes.
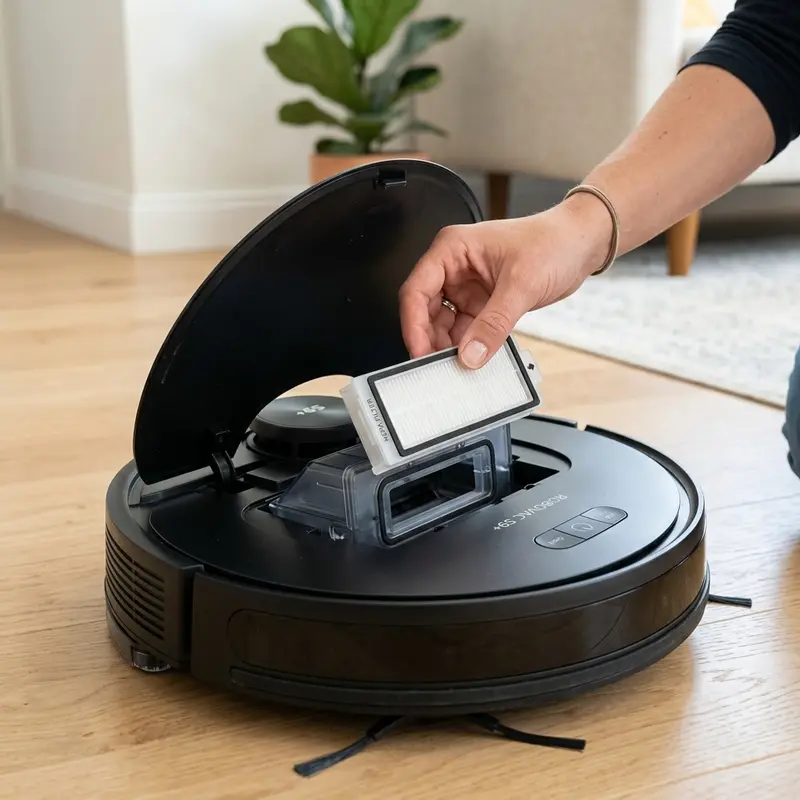
2. Removing and Cleaning the Main Brush Step by Step
To remove and clean the main roller brush safely without breaking the plastic retention clips, follow these instructions:
- Power off the robot vacuum using the physical power switch and place it upside down on a soft towel;
- Locate the brush guard cover. Press the two release tabs simultaneously to unlock the guard and lift it out;
- Grasp the main brush by the non-driven end and pull it upward out of the plastic housing;
- Use a pair of scissors or the cleaning tool that came with your vacuum to cut away wrapped hair spools. Slice along the dedicated guides on the roller to avoid cutting the nylon bristles;
- Pull off the black plastic caps on the ends of the roller. Remove compacted hair that collects under the metal bearings;
- Clean the interior of the vacuum suction channel with a cloth dampened with isopropyl alcohol to clear fine dust;
- Reinstall the end caps, insert the geared end of the roller into the drive socket, drop the bearing end into its slot, and snap the guard cover back on until the tabs click.
3. Preventing Plastic Housing Damage and Lubricating Bearings
The greatest risk of neglecting main brush cleaning is the melting of the plastic housing. When hair wraps around the end bearings, it increases friction. The heat generated by the axle spinning under friction can exceed the melting point of the ABS plastic chassis. This melts the lateral socket, damaging the chassis and requiring a complete replacement of the inner frame. Applying a drop of silicone oil or white lithium grease to the metal axle pin weekly prevents friction heat build-up.
If you use other home automation devices that experience Wi-Fi drops, see our guide on how to share Intelbras Mibo Smart camera access to manage local network access.
Additionally, to ensure maps load quickly on your mobile app, check our review on the best Wi-Fi router for security cameras, which discusses managing 2.4 GHz IoT channels.

4. Consumable Lifespan and Replacement Schedule Table
The reference table below details the recommended maintenance and replacement schedule for the main brush and related suction components:
| Suction Component | Cleaning Frequency | Cleaning Materials | Estimated Lifespan | Symptom of Wear |
|---|---|---|---|---|
| Roller Brush | Weekly | Scissors, cutting tool, tweezers | 6 to 12 months | Bent bristles, torn rubber blades, poor sweeping. |
| Air Filter | Every 2 runs | Dry cleaning brush | 3 to 6 months | Drastic drop in suction power, fine dust leakage. |
| Duct Rubber Strip | Monthly | Damp microfiber cloth | 12 months | Cracked or torn rubber, causing dust leaks. |
Main Roller Brush Commutation Mechanics and Torque Delivery
The central hybrid brush roller rotates counter to the vacuum's travel path, sweeping up heavy debris into the suction port. This motion demands high mechanical torque, which is supplied by a DC motor connected to a nylon reduction gearbox inside the vacuum chassis.
When hair and threads wrap around the roller, friction spikes. The motor draws more current, generating clicking noises and heating the gearbox housing. Wiping the brush core clean weekly prevents gear wear and protects the motor from thermal fatigue caused by mechanical overloads.
End Bearing and Brass Bushing Maintenance
The ends of the main brush roller feature plastic sleeves containing metal bearings that ensure quiet rotation. Fine dust and hair fibers migrate into these bearing caps, packing into a solid mass that jams the bearings. This friction can melt the plastic chassis mounting socket.
Always pull off the black end caps during weekly cleaning to clear trapped hair with tweezers. Apply a single drop of high-viscosity silicone oil to the axle pin to ensure smooth rotation and prevent heat build-up in the chassis socket.
Main Brush Gearbox Lubrication and Wear Prevention
The reduction gearbox driving the central roller brush contains nylon gears and steel support shafts. During normal vacuuming, fine gypsum or construction dust can bypass the outer rubber seals and enter the gearbox housing, mixing with the factory grease. This creates a gritty abrasive compound that wears down the gear teeth.
If you notice clicking sounds or vibrations in the main brush housing, open the gearbox casing. Wipe away the contaminated grease with isopropyl alcohol and apply fresh white lithium grease. This lubrication prevents mechanical drag and protects the nylon gears from wearing down prematurely.
Silicone Blade Alignment and Cleaning Tool Operations
Proper alignment of the silicone blades on the main brush roller is vital to seal the vacuum path against hard floors. If the blades are torn or warped from incorrect storage, static suction pressure drops, leaving debris behind in tile grout lines.
Always use the hair-cutting tool provided with the vacuum to clean the roller. Slide the blade through the guide slots on the roller body to avoid cutting the nylon bristles. Wash the plastic brush guard cover under running water to clear dust and dry it fully before use.
Cleaning the Roller Brush Guard Cover and Locking Clips
The plastic guard cover over the main brush features locking tabs that hold it in place. Fine dust and hair packing into these tabs can block them from locking completely, leaving the cover loose and causing it to drag on rugs during cleaning cycles.
If the cover falls off, it can jam the hybrid roller, stopping rotation and risking damage to the drive motor. Clean the locking tabs weekly and wash the guard cover under running water, drying it fully before snapping it back onto the chassis.
Checking Chassis Rubber Seals and Main Brush Cover Alignment
The central brush compartment relies on flexible rubber strips to maintain suction pressure. If these rubber seals dry out or tear, air leaks will drop the static negative pressure, leaving fine dust behind on tile grout lines.
During weekly maintenance, inspect the rubber seals along the brush frame. Clean the slots with a damp cloth to remove compacted dirt, ensuring the plastic guard cover snaps on with correct pressure to keep the vacuum channel sealed.
For more home automation advice, check our guide on how to share Smart Life camera to manage network configurations.
Drive Socket Maintenance and Gear Wear Prevention
The square plastic drive socket connecting the roller brush to the internal motor shaft is subject to wear under high torque loads. If dust accumulates in this socket, the drive pins can round off, causing the brush to slip or stop rotating entirely.
Clean the square drive socket inside the chassis using a dry brush. Clear out accumulated grit and apply a drop of dry PTFE lubricant to prevent wear on the plastic socket tabs, ensuring reliable roller brush rotation.
Check our guide on how to share Smart Life camera to manage network configurations for connected devices.
Drive Axle Alignment and Cleaning of Internal Gear Housings
Correct alignment of the square drive axle inside the gearbox socket is essential to prevent vibration wear on the central roller brush. If the roller is dropped into the slot unevenly, the resulting side play will wear down the plastic tabs, increasing operational noise and causing the gears to slip during cleaning cycles on rugs.
Verify that the end bearing sits flat in the chassis guide slot before snapping the brush guard cover shut. Regularly clean the socket cavity using a dry cotton swab to remove accumulated pet fur. This simple step keeps the drive connection snug and prevents gear stripping, maintaining strong suction performance over long-term home use.
Chassis Dynamic Balance and Main Roller Brush Height Adjustment
The systematic navigation firmware calculates drive wheel speed based on drag friction reports from the main roller brush compartment. If the brush roller is jammed by thick thread wraps or if the suspension springs under the compartment lose tension, the vacuum will experience unbalanced rolling drag. This drag makes the wheels slip, resulting in diagonal pathing errors and incomplete cleaning map layouts.
Keep the main roller clean and verify that the floating brush housing moves up and down freely. This ensures consistent contact pressure on hard floors and carpets, maintaining balanced chassis travel and preventing drive system overload.
Analyzing Roller Guard Durability and Locking Clips
The plastic guard cover over the central brush roller features locking clips that keep it secured in the duto. Fine dust and hair packing into these clips can block them from locking completely. This leaves the guard loose and causes it to drag on rugs during cleaning runs.
Clean the locking clips weekly and wash the guard cover under running water, drying it fully before locking the roller central back in the chassis.
Understanding Roller Guard Pin Alignment and Wear Detection
The guard cover securing the central brush roller has dedicated guide tabs that lock into slot cutouts in the chassis. If fine dust packs into these tabs, they will fail to engage fully. A loose cover can drop onto the brush, increasing friction and motor temperature.
Check the locking tabs during weekly clean cycles. Wipe down the plastic and rubber seals, and make sure the tabs click into place securely. Replacing a worn cover prevents mechanical failures and keeps the brush system quiet during home clean runs.
Dealing with Tangled Pet Hair and Long Fibers on Main Brush Bearings
When cleaning the main roller brush, pay special attention to the end caps and bearings. Hair easily wraps around these metal shafts, creating high friction that can melt the plastic housing. Use the utility cleaning tool blade to slice through hair build-up, and make sure the yellow bearings spin freely before reinstalling the brush. Regular lubrication with a tiny drop of silicone grease keeps the brush gear assembly running smooth and prevents battery drain.
Frequently Asked Questions (FAQ)
What indicates that the main roller brush bearings need lubrication?
A high-pitched squeaking noise or hot smell during operation suggests that the brush bearings are dry and require silicone grease.
The vacuum beeps showing a "main brush stuck" error even when clean. Why?
This happens if fine dust or hair enters the gear reduction housing of the brush motor inside the chassis. If the motor detects high rotation resistance, the motherboard cuts power and triggers the error beep.
Can I wash the main roller brush with water?
Yes. The nylon and rubber roller can be washed with water and mild dish soap. Remove the metal end bearings before washing and ensure the brush is 100% dry before reinstalling it.
How do I stop the main brush from squeaking?
Squeaking occurs when dust enters the brass end bearings. Pull off the black end cap, remove any trapped fibers, and apply a single drop of silicone oil to the axle pin.
Conclusion
Removing and cleaning the main roller brush weekly is key to maintaining optimal vacuum performance and preventing motor damage. This simple step keeps the suction path clear and extends the life of your robot vacuum.


