
To safely install an MPPT charge controller, always connect the battery bank first to power the logic board, then wire the solar PV array input.
Introduction
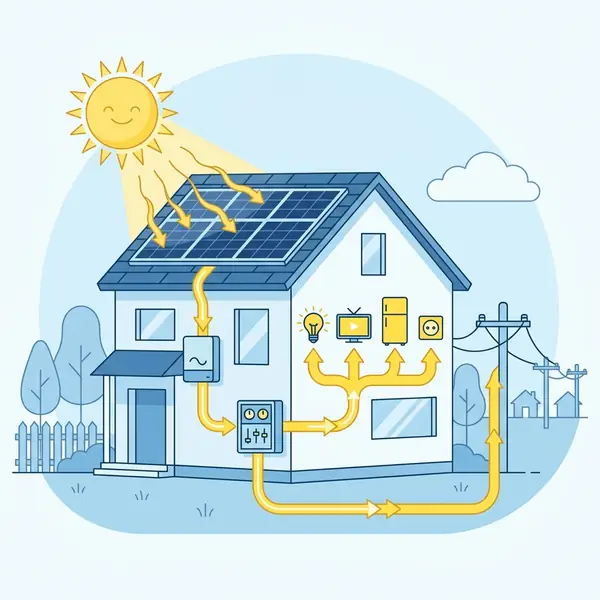
The integration of solar energy solutions into residential and commercial applications is becoming increasingly popular due to the rising costs of electricity and the global shift towards sustainable energy sources. One of the most effective means of optimizing solar energy systems is through the use of Maximum Power Point Tracking (MPPT) charge controllers. This blog post will provide an in-depth exploration of MPPT technology, its advantages, installation techniques, maintenance recommendations, and cost analysis, ensuring you have a comprehensive understanding of how to maximize the efficiency of your solar setup.
Understanding MPPT Technology
What is MPPT?
MPPT stands for Maximum Power Point Tracking, a sophisticated method that allows solar charge controllers to optimize the energy harvested from solar panels. By adjusting the electrical operating point of the panels, MPPT helps ensure that the system operates at its maximum capacity, converting the highest possible amount of sunlight into usable electricity.
This technology is particularly beneficial in environments where solar irradiance varies throughout the day, such as during cloudy weather or when panels are partially shaded.
How MPPT Works
MPPT charge controllers operate by continuously monitoring the voltage and current produced by solar panels. They utilize complex algorithms to identify the maximum power point—where the product of voltage and current is at its peak. By dynamically adjusting the load on the solar panels, MPPT controllers can extract more energy compared to traditional PWM (Pulse Width Modulation) controllers, especially under non-ideal conditions.
This real-time adjustment allows MPPT technology to significantly enhance the overall efficiency of solar energy systems, making it a preferred choice for many applications.
Operational Specifications
MPPT controllers typically support a wide voltage input range, accommodating various solar panel configurations. They are also compatible with different battery types, including lead-acid and lithium-ion technologies. The efficiency of an MPPT controller can range from 90% to over 98%, which greatly improves energy capture compared to other types of controllers.
For instance, a 60A MPPT controller might feature a maximum input voltage of 150V, suitable for 12V, 24V, or 48V systems, providing flexibility in system design and implementation.
Advantages and Disadvantages
Advantages of MPPT charge controllers include:
- Higher energy efficiency, resulting in increased power output, particularly in low-light conditions.
- Flexibility to work with various voltage outputs from solar panels, making them suitable for diverse setups.
- Enhanced performance during partial shading or overcast weather, maximizing energy harvesting capabilities.
However, there are also drawbacks to consider: Para saber mais detalhes, leia nosso guia sobre building a DIY solar power system.
- Higher initial costs when compared to PWM controllers, which may be a barrier for budget-conscious consumers.
- More complex circuitry, potentially requiring additional maintenance and expertise during installation.
- Risk of overheating if not appropriately sized for the installation, necessitating effective thermal management strategies.
Installation Process
Tools and Materials Needed
Before beginning the installation process, gather the necessary tools and materials: Para saber mais detalhes, leia nosso guia sobre building a DIY solar power system.
- MPPT charge controller
- Solar panels (ensure compatibility with the controller)
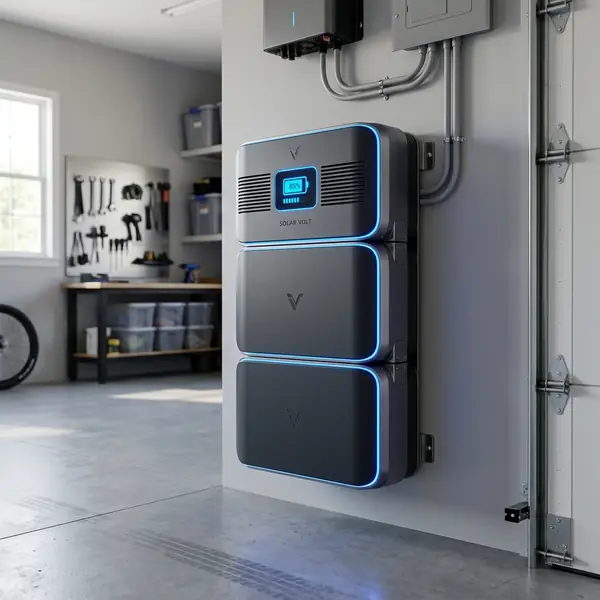
- Battery bank (sized according to your energy needs)
- Wiring and connectors (appropriate gauge for your current load)
- Multimeter for testing voltage and current
- Screwdrivers and wrenches
- Drill (if mounting to a structure)
- Safety gloves and goggles
- Wire strippers and crimpers for secure connections
Step-by-Step Installation Guide
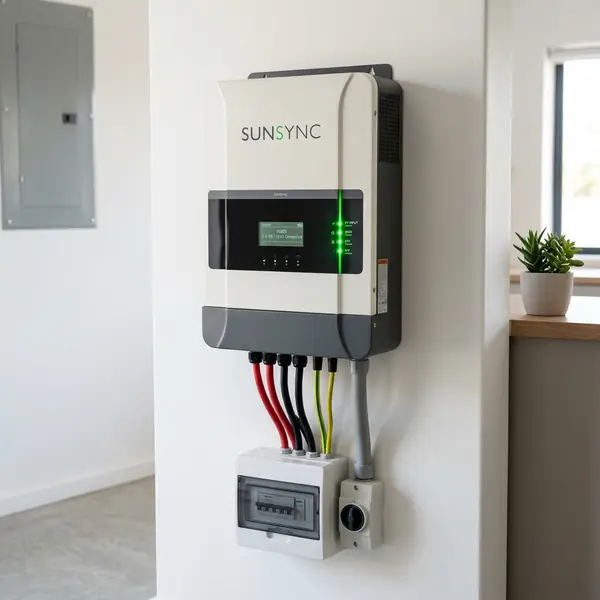
- Mount the MPPT Charge Controller: Select a location that is easily accessible and close to both the battery bank and solar panels. Ensure protection from the elements and provide adequate ventilation to prevent overheating.
- Connect the Solar Panels: Utilize appropriate gauge wire (e.g., 10 AWG for up to 30A) to connect the solar panels to the MPPT controller. Pay careful attention to polarity to avoid potential damage to the controller.
- Connect the Battery Bank: According to the manufacturer's guidelines, connect the battery bank to the MPPT controller, ensuring correct polarity. The battery voltage must match the controller's specifications to ensure safe and effective operation.
- Configure the Controller: Adjust the settings on the MPPT controller based on the battery type and solar panel specifications. Set charge voltage and current limits according to manufacturer recommendations to optimize battery performance.
- Test the System: Use a multimeter to verify all connections and ensure proper system functionality. Measure output voltage and current from the solar panels, confirming they align with expected values.
Regulations and Compliance

Prior to installation, it is important to review local regulations concerning solar installations. This may include building codes, necessary permits, and safety standards. Ensuring compliance with these regulations not only guarantees the safe operation of the system but also protects the user and the environment.
Para saber mais detalhes, leia nosso guia sobre building a DIY solar power system. Para saber mais detalhes, leia nosso guia sobre building a DIY solar power system. Para saber mais detalhes, leia nosso guia sobre building a DIY solar power system.
Para saber mais detalhes, leia nosso guia sobre building a DIY solar power system. Para saber mais detalhes, leia nosso guia sobre building a DIY solar power system. Para saber mais detalhes, leia nosso guia sobre building a DIY solar power system.
Para saber mais detalhes, leia nosso guia sobre building a DIY solar power system. For a step-by-step walkthrough, check out our guide on building a DIY solar power system. For a step-by-step walkthrough, check out our guide on building a DIY solar power system.
Consulting with local utility companies about interconnection standards is also important if you plan to connect the solar system to the grid.
Cost Analysis
Initial Costs
The cost of installing an MPPT solar charge controller can vary significantly based on the system's size, the quality of components, and labor costs. Here’s a detailed breakdown of the initial costs:
| Component | Average Cost | Specifications |
|---|---|---|
| MPPT Charge Controller | $200 - $600 | 25A to 100A, 12V to 48V systems, with efficiency ratings of 95%+ |
| Solar Panels | $0.50 - $2.00 per watt | Polycrystalline (15-17% efficiency) or monocrystalline (18-22% efficiency) |
| Battery Bank | $300 - $1,500 | Lead-acid (12V, 200Ah) or lithium-ion (12V, 100Ah) options |
| Wiring and Connectors | $50 - $200 | AWG rating based on distance and current load |
| Installation Labor | $100 - $500 | Depends on location and complexity of the installation |
Long-term Savings and ROI
For residential applications, homeowners can expect a return on investment (ROI) period ranging from 5 to 15 years, depending on energy consumption patterns and local electricity prices. In commercial settings, savings can be even more substantial, with average installations yielding annual savings of $5,000 to $20,000 based on energy use and prevailing rates.
The trend of decreasing solar technology costs, combined with rising electricity prices, can further enhance the ROI. For a detailed analysis of the payback period of a photovoltaic system, consider using an online ROI calculator or consult with a solar energy expert.
Case Studies
Residential Application
A family in California installed a 5kW solar system with an MPPT charge controller. The total initial investment was $15,000, which included installation, solar panels, and the controller. With annual savings of approximately $2,000 on electricity bills, they projected an ROI of 7.5 years, significantly enhancing their long-term financial outlook.
Commercial Application
A retail store in Texas invested $100,000 in a 50kW solar installation utilizing MPPT technology. The business reported annual savings of $15,000 on energy costs, resulting in an ROI of 6.67 years. Additionally, they benefited from a 30% tax credit, which substantially lowered their initial financial commitment and improved cash flow.
Maintenance of MPPT Charge Controllers
Regular Maintenance Steps
1. Visual Inspection: Regularly check the MPPT controller and wiring for any signs of physical damage or wear. Ensure the mounting location remains secure and free of debris.
Adicionalmente, você pode conferir as regras de wire solar panels to an inverter.
2. Clean Connections: Inspect all electrical connections for cleanliness and corrosion. Use contact cleaner if needed to maintain optimal conductivity.
3. Monitor Performance: Utilize the controller’s display or an external multimeter to regularly check voltage and current output. Document this data to identify performance trends over time.
Adicionalmente, você pode conferir as regras de wire solar panels to an inverter.
4. Firmware Updates: If the MPPT controller supports firmware updates, ensure these are performed to maintain optimal performance and security. Manufacturers may release updates that enhance functionality.
Adicionalmente, você pode conferir as regras de wire solar panels to an inverter. Adicionalmente, você pode conferir as regras de wire solar panels to an inverter. Adicionalmente, você pode conferir as regras de wire solar panels to an inverter.
Adicionalmente, você pode conferir as regras de wire solar panels to an inverter. Adicionalmente, você pode conferir as regras de wire solar panels to an inverter. Adicionalmente, você pode conferir as regras de wire solar panels to an inverter.
Additionally, you can learn more about wire solar panels to an inverter. Additionally, you can learn more about wire solar panels to an inverter.
Adicionalmente, você pode conferir as regras de wire solar panels to an inverter.
Detailed Maintenance Instructions
- Before performing any maintenance, turn off the system to ensure safety.
- Inspect all connections for tightness and corrosion, replacing any corroded connectors as necessary.
- Clean any dust or debris from the controller and surrounding area to prevent overheating issues.
- Check the state of charge and health of the battery, ensuring proper voltage levels are maintained for optimal performance.
- Document any issues and performance metrics for future reference, aiding in troubleshooting and scheduling future maintenance.
Hidden Costs and Long-term Operational Issues
While MPPT solar charge controllers can improve overall system efficiency, it’s important to consider potential hidden costs, such as: Consulte dados oficiais diretamente no site da National Renewable Energy Laboratory (NREL).
- Replacement of components due to wear and tear, especially in harsh environmental conditions.
- Risk of overheating if the system is not properly ventilated, potentially leading to premature failure.
- The cost of supplementary electricity if the system underperforms due to improper installation or sizing, necessitating a backup power source.
Maintaining a regular maintenance schedule can help mitigate some of these issues. Additionally, budgeting for replacement parts and occasional service calls is recommended to ensure long-term system reliability. Establishing a contingency fund for unexpected repairs can help maintain uninterrupted service.
Manutenção e Monitoramento de Sistemas Fotovoltaicos
A manutenção regular de sistemas fotovoltaicos é fundamental para garantir um desempenho ideal ao longo de sua vida útil. A primeira etapa envolve a inspeção visual das células solares, estruturas de suporte e fiação. É importante verificar se há sujeira, detritos, ou desgaste visível que possa afetar a eficiência do sistema.
Limpeza deve ser realizada com água destilada e um pano macio, evitando produtos químicos agressivos que podem danificar os materiais.
Além disso, o monitoramento contínuo da produção de energia é vital. Sistemas modernos frequentemente incluem sensores e software que permitem a vigilância em tempo real da eficiência do sistema. Qualquer queda significativa na produção deve ser investigada imediatamente.
Isso pode indicar problemas como sombreamento, falhas em inversores ou degradação das células solares. Para consultar referências e normativas oficiais, acesse a página da National Renewable Energy Laboratory (NREL).
Os inversores, responsáveis por converter a corrente contínua gerada pelos painéis em corrente alternada utilizável, são componentes críticos que requerem atenção especial. A substituição de inversores pode ser necessária a cada 5 a 15 anos, dependendo do modelo. A monitorização de sua temperatura e eficiência pode indicar a necessidade de manutenção antes que ocorra uma falha total.
Outro aspecto a ser considerado é a verificação das conexões elétricas. O aquecimento excessivo e a corrosão podem afetar a eficiência das conexões, levando a perdas de energia. Inspecionar e apertar as conexões periodicamente pode prevenir problemas.
Documentar todas as manutenções e inspeções ajuda a identificar padrões e prever necessidades futuras. Para consultar referências e normativas oficiais, acesse a página da National Renewable Energy Laboratory (NREL).
Desafios e Soluções para a Integração de Sistemas de Armazenamento de Energia
A integração de sistemas de armazenamento de energia, como baterias, em instalações solares apresenta desafios técnicos significativos. Um dos principais desafios é a compatibilidade entre os bancos de baterias e os inversores. É importante que os componentes sejam projetados para trabalhar em conjunto, garantindo que a eficiência do sistema não seja comprometida.
A escolha do tipo de bateria, seja de íon de lítio ou chumbo-ácido, também influencia a performance e o custo do sistema.
Outro aspecto crítico é a gestão da carga e da descarga das baterias. Sistemas de gerenciamento de bateria (BMS) são necessários para monitorar a saúde da bateria, regular a carga e descarga, e prevenir sobrecargas ou descargas excessivas. A implementação de um BMS eficaz pode aumentar a vida útil da bateria e melhorar a segurança do sistema.
Para consultar referências e normativas oficiais, acesse a página da National Renewable Energy Laboratory (NREL). Para consultar referências e normativas oficiais, acesse a página da National Renewable Energy Laboratory (NREL). Para consultar referências e normativas oficiais, acesse a página da National Renewable Energy Laboratory (NREL).
For official guidelines and safety standards, visit the National Renewable Energy Laboratory (NREL) website.
For official guidelines and safety standards, visit the National Renewable Energy Laboratory (NREL) website.
Para consultar referências e normativas oficiais, acesse a página da National Renewable Energy Laboratory (NREL). Para consultar referências e normativas oficiais, acesse a página da National Renewable Energy Laboratory (NREL). Para consultar referências e normativas oficiais, acesse a página da National Renewable Energy Laboratory (NREL).
Para consultar referências e normativas oficiais, acesse a página da National Renewable Energy Laboratory (NREL).
É importante considerar as especificações do BMS ao projetar o sistema, garantindo que suporte a capacidade total da instalação.
Adicionalmente, a modelagem do consumo de energia é importante para otimizar a utilização do armazenamento. Análises detalhadas do padrão de consumo ajudam a dimensionar adequadamente o sistema de baterias. Se o armazenamento for superdimensionado, pode resultar em custos desnecessários; se subdimensionado, pode levar a interrupções no fornecimento de energia.
Por fim, a manutenção das baterias não deve ser negligenciada. Verificações regulares de integridade, temperatura e níveis de carga são necessárias para garantir que o sistema opere de forma eficiente. A documentação das condições de operação e da manutenção realizada é fundamental para o planejamento de substituições e para a análise de desempenho ao longo do tempo.
What is the difference between PWM and MPPT charge controllers?
MPPT controllers are up to 30% more efficient because they adjust input voltage to harvest maximum power from the panels.
Can you connect solar panels in series with an MPPT controller?
Yes, MPPT controllers support higher input voltages, allowing series configuration which reduces wiring losses.
How do I set the battery type on an MPPT charge controller?
Navigate through the LCD menu settings to select your specific battery chemistry (Lead-Acid, AGM, Gel, or LiFePO4).
What wire size should I use for a 40A MPPT controller?
Use 8 AWG or 10 AWG copper wire to prevent voltage drop and overheating between components.


