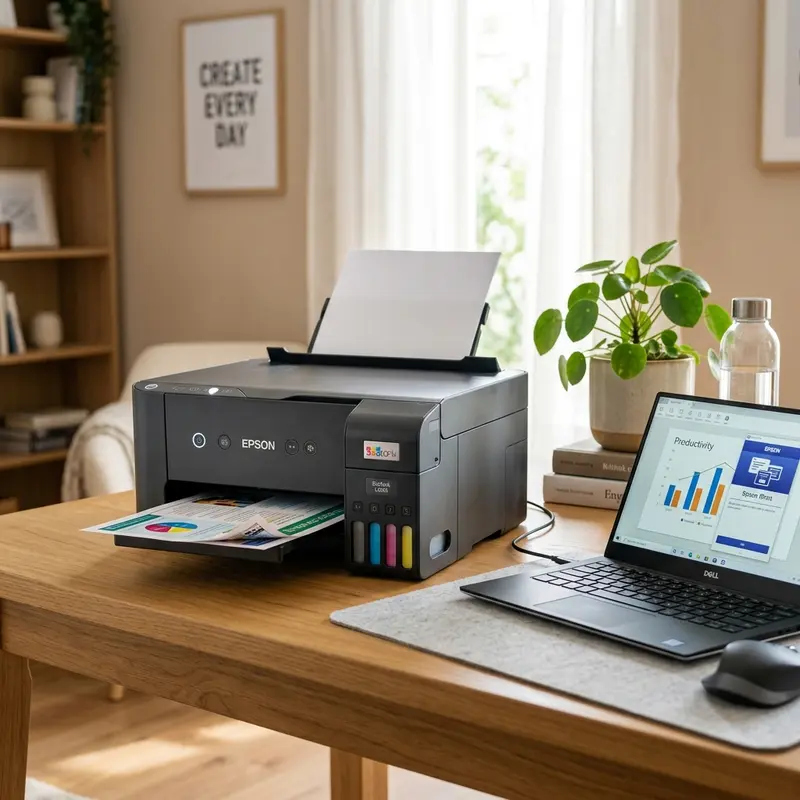
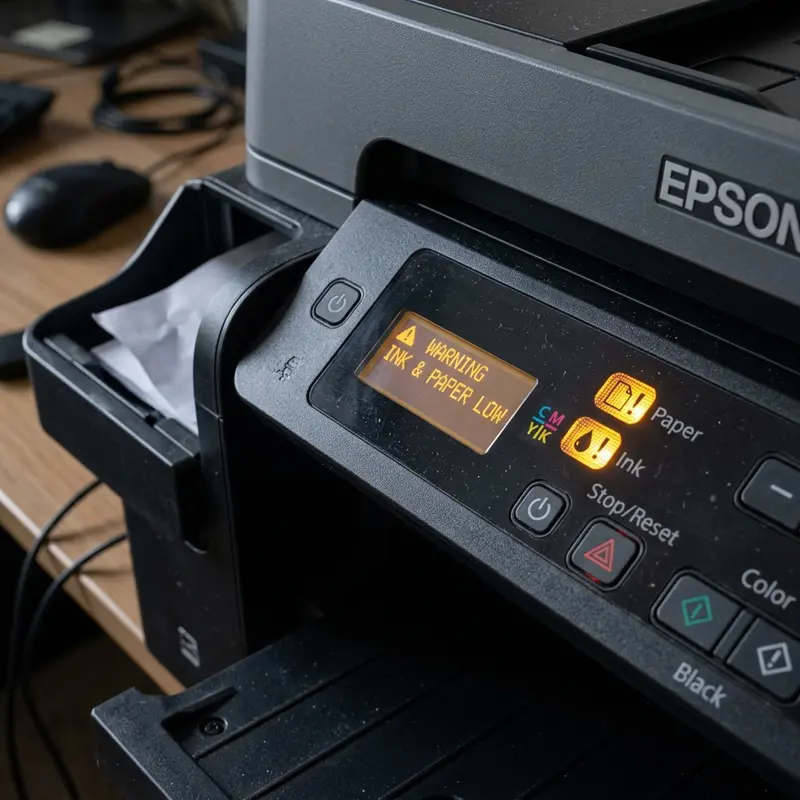
The Epson EcoTank L3250 is globally recognized as a highly reliable workhorse, admired for its outstanding ink efficiency and print quality. However, like any precision electromechanical device that handles moving media, it can occasionally experience paper jams. A paper jam typically manifests as a document getting stuck mid-feed, paper wrinkling during the printing process, or the printer halting completely while flashing the red paper status indicator light (the sheet icon) on the main physical control panel.
To clear a paper jam error on the Epson L3250 printer and prevent it from recurring, you must turn off the printer, gently pull the jammed sheet out in the natural direction of the paper feed path to avoid damaging the internal gears, clean the rubber pick-up roller and separation pad with isopropyl alcohol to remove celulose dust, and inspect the paper feed slot for any fallen foreign objects.
The Mechanics of the Epson L3250 Feed and Roller Assembly
To perform proper troubleshooting without damaging the delicate mechanical assemblies inside your Epson L3250, you must understand the architecture of the paper feed mechanism. This printer utilizes a gravity-assisted, top-loading Auto Sheet Feeder (ASF) design. Paper loaded into the rear tray descends vertically through a narrow paper path, passes underneath the printhead carriage, and is ejected onto the front output tray.
The primary mechanical and electronic components responsible for this movement are:
- The Pick-Up Roller: A D-shaped cam roller covered in a textured, high-grip rubber sleeve. It rotates against the top sheet of the paper stack to pull it down into the paper path.
- The Separation Pad: A spring-loaded rubber pad situated directly opposite the pick-up roller. Its job is to provide friction against the second sheet in the stack, ensuring that only a single page is fed into the printer at a time.
- The Paper Edge (PE) Sensor: A lightweight mechanical plastic flag connected to a photo-interrupter sensor. When paper pushes the flag down, the optical sensor detects the sheet's presence. When the trailing edge of the paper passes, the flag springs back, indicating that the page has cleared the print zone.
- Feed Roller and Eject Roller: Driven by a high-torque DC motor and a series of plastic gears, these rollers grip the paper tightly to maintain precise step-by-step movement under the printhead, while micro-toothed metal star wheels guide the wet printout to the output tray.
A paper feed failure occurs when the pick-up roller loses its grip due to dust accumulation, or when a foreign object or torn paper scrap physically jams the PE sensor flag in the 'active' position, causing the printer to report a constant paper jam even when there is no paper visible in the system.
Diagnosing Different Paper Feed and Jam Errors
Not all paper feed errors are identical, and treating a roller slippage the same way as a physical obstruction can lead to unnecessary wear. Understanding the differences in symptoms will help you choose the best diagnostic path:
| Visual Symptom | Most Likely Cause | Recommended Solution | Technical Level |
|---|---|---|---|
| Roller spins, but paper does not feed | Pick-up roller coated with paper dust or worn smooth | Clean the roller rubber with isopropyl alcohol | Beginner |
| Paper feeds at an angle and stops | Uneven paper guides or a foreign object blocking one side | Adjust paper guides; clear the path using a thick card | Intermediate |
| Multiple sheets are pulled at once | Damp paper sticking together or worn separation pad | Replace paper stack; clean or replace separation pad | Intermediate |
| Paper jam error with no paper inside | Paper Edge (PE) sensor flag stuck in active position | Gently clear debris near printhead; reset sensor flag | Intermediate |
How to Safely Remove Jammed Paper Without Damaging Gears
When a sheet of paper jams, the natural urge is to pull the paper out as quickly as possible. However, pulling paper forcefully or in the opposite direction of the natural paper path can easily strip the teeth of the plastic drive gears, break the delicate PE sensor flag, or tear the paper, leaving tiny, inaccessible pieces trapped in the roller mechanism.
Step-by-Step Safe Extraction Procedure:
- Immediately turn off the printer by pressing the Power button. Unplug the power cable from the electrical outlet to ensure the carriage motor and rollers are completely de-energized.
- Remove any loose paper from the rear input tray.
- Open the internal access door (where you would view the ink dampers and printhead). Check if the printhead carriage is parked on top of the jammed paper. If it is, and the carriage is free to move, gently slide it out of the way. Do not force it if it is locked in the home position.
- If the leading edge of the paper is visible in the front output tray, use both hands to pull the paper slowly and steadily toward the front of the printer (the natural direction of flow). Pulling with both hands prevents the paper from tearing.
- If the paper is trapped in the rear feeder and cannot be pulled forward, pull it upward from the rear input tray, using a slow, constant motion.
- Once the paper is out, inspect it to see if any corners or edges are missing. Use a flashlight to check the entire width of the internal paper path, particularly around the extreme left and right corners, for any torn fragments.
Cleaning the Pick-Up Roller and Separation Pad
As paper passes through the feed slot, it sheds a microscopic layer of cellulose dust. Over time, this fine white powder builds up on the rubber surface of the pick-up roller, forming a slippery coating. The roller can no longer create enough friction to grab the paper, resulting in feed failures and frequent paper jam alerts.
Step-by-Step Cleaning Instructions:
- Turn off the printer and disconnect the power cord.
- Locate the gray or black rubber pick-up roller inside the rear paper feed slot. You may need to peer inside with a flashlight.
- Lightly dampen a cotton swab or lint-free microfiber cloth with isopropyl alcohol. Do not use water or standard rubbing alcohol, as they evaporate slowly and can cause corrosion on metal shafts.
- Press the damp swab against the rubber roller. Since the roller only rotates in one direction during normal operation, you must rotate it manually to clean it fully. To do this, locate the white plastic gears on the left side of the feeder assembly and turn them gently to rotate the roller.
- Wipe the rubber surface thoroughly until the swab no longer picks up gray or white paper dust.
- Clean the rubber surface of the separation pad located directly below the roller using the same method.
- Let the alcohol dry completely for about 5 minutes before plugging the printer back in and testing it.
Clearing Foreign Objects Using the Rigid Card Method
Because the Epson L3250 has an open, top-loading paper tray, it is easy for small household items like paperclips, staples, coins, pen caps, or dust bunnies to fall into the paper path. These objects will block the paper at the exact same point every time, causing recurring jams.
If you suspect an object is trapped inside the paper path and you cannot see it:
- Unplug the printer and remove all paper from the tray.
- Find a piece of rigid paper or thin plastic, such as a laminated card, a thick photo sheet (260g/m² or higher), or a piece of thin cardboard.
- Insert the rigid sheet into the rear paper slot and slide it down into the paper path manually, applying firm but gentle pressure.
- The rigid card will act as a physical plow, pushing any trapped objects down and out onto the front output tray or into the print area where they can be retrieved with tweezers.
- Never insert screwdrivers, knives, or metal tools into the paper path, as they can tear the rubber rollers or scratch the delicate plastic sensors.
Preventative Maintenance: Selecting Paper and Managing Humidity
The type of paper you use and how you store it play a vital role in preventing paper jams. By following these basic guidelines, you can ensure a reliable feed cycle and extend the life of your printer's mechanical components:
- Avoid humid paper: Paper absorbs moisture from the air. In humid environments, the pages will swell slightly and stick together, causing the printer to pull multiple sheets at once or wrinkle the paper. Always store unused paper in its original plastic wrap and only load the amount you plan to use immediately.
- Use supported paper weights: The Epson L3250 is designed to feed standard paper weights ranging from 64g/m² to 90g/m² in the standard tray. For photo paper, it supports up to 256g/m² (or 300g/m² for genuine Epson photo media). Using paper that is too thick or too thin will strain the motor and cause frequent jams.
- Inspect paper before loading: Ensure the paper is free of wrinkles, creases, or torn edges. Fan the stack of paper before placing it in the tray to separate the sheets and reduce static electricity.
Cleaning the Paper Edge (PE) Sensor Assembly on the L3250
A persistent paper jam error on the Epson L3250 is often caused by a dirty Paper Edge (PE) sensor. This sensor is located along the paper path and monitors sheet entry using an infrared beam. When paper dust covers the sensor lens, the beam is blocked, causing the printer to display a paper jam warning even if the path is clear. Use a can of compressed air to clean the sensor area, or feed a piece of heavy cardstock through the path manually with the printer turned off to clear any obstructions.
Replacing the Retard Roller and Tension Springs for Feeding Stability
If your Epson L3250 regularly pulls multiple sheets at once, the retard roller or separation pad assembly may be worn. The separation pad applies friction to ensure only one page is fed at a time. If the pad is worn, check the tension springs under the input tray. Replacing these springs or cleaning the rubber roller with a damp cloth restores proper separation, preventing paper jams during large print runs.
How Air Humidity Affects Paper Friction and Feed Mechanics
Humidity is a major environmental factor that directly impacts paper feed reliability on the Epson EcoTank L3250. Standard 75gsm and 90gsm copier paper is hygroscopic, meaning it absorbs water vapor from the surrounding air. When paper becomes damp, its surface friction increases, causing sheets to stick together. When the pickup roller rotates, it draws multiple sheets into the path at once, leading to overlapping feeds and internal jams. Always store your paper stocks in their original sealed wrapping in a dry drawer, and fan the paper stack before loading it.
Maintaining the Mechanical Retard Rollers for Consistent Feeding
The feed tray of the Epson L3250 utilizes a mechanical retard roller that spins in the opposite direction of the main pickup roller to push back extra sheets. Over time, paper fibers and dust accumulate on the rubber grooves of the retard roller, preventing it from spinning or providing traction. Wipe the retard roller gently with a water-dampened swab. This ensures the roller separates individual sheets of paper correctly, preventing paper feed jams during print runs.
Fixing Carriage Striking Jams Caused by Paper Alignment Issues
When paper feeds at a slight angle due to poorly adjusted side guides, the edge of the sheet can lift and curve within the carriage path. As the printhead carriage travels back and forth to apply ink, it strikes the raised edge of the paper, leading to carriage jams. Always adjust the plastic feed guides in the rear input slot to touch the paper edges lightly, ensuring the paper feeds flat through the printer carriage channel.
Checking for Worn Out Feed Roller Gears Inside the Mechanical Assembly
If your paper jam errors persist after cleaning the rollers and the edge sensor, check for physical wear inside the printer's mechanical gear train. The paper feed mechanism relies on a series of small, white plastic gears connected to the main stepper motor. Over years of heavy printing, these gear teeth can wear down, slip, or collect debris. This prevents the pickup roller from turning at the correct speed, causing paper to stall and triggering paper jam warnings. Inspect the gears with a flashlight and brush away any dust to restore smooth mechanical rotation.
Understanding the Electronic Paper Guide Alignment Features
The print driver of the Epson L3250 EcoTank printer works in tandem with the physical paper guides in the input slot. If you change the paper size in the software settings but fail to align the plastic paper guides on the rear tray to match, the sheet will enter the channel unevenly. The electronic sensor detects the skewed edge and immediately stops the printer carriage to prevent ink from spraying onto the rollers, triggering a paper out or jam error. Always match your driver settings with physical tray adjustments.
Frequently Asked Questions (FAQ)
Below are the most common technical questions and answers regarding paper jams on the Epson L3250.


