How to Manually Clean and Flush Epson L3250 Print Head (Syringe)
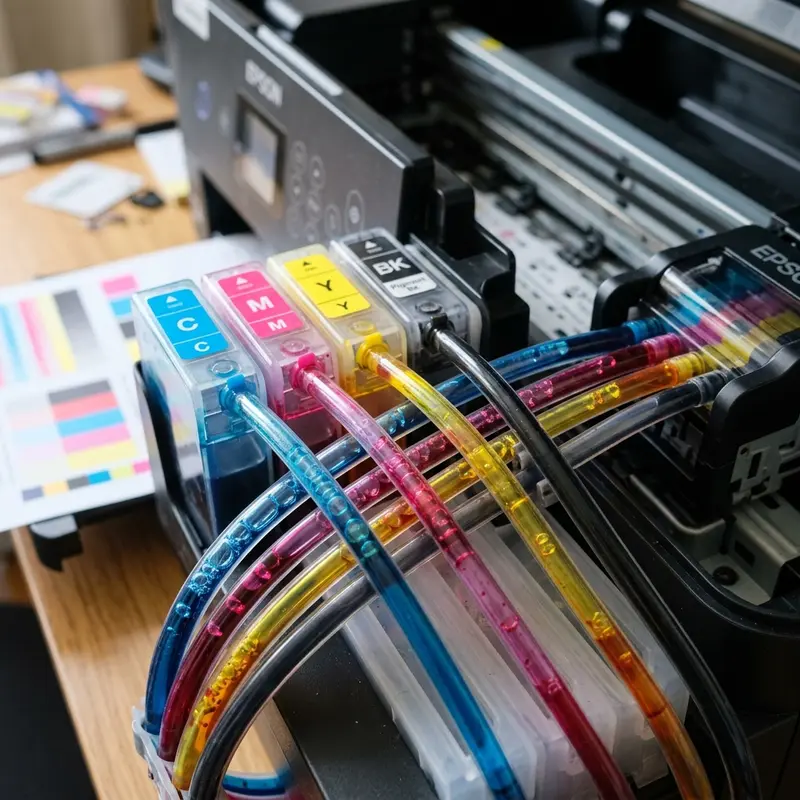
The Epson EcoTank L3250 is widely valued for its exceptional running costs. However, if the device sits idle for several weeks, or if low-quality generic inks are used, the liquid ink inside the MicroPiezo print head nozzles will slowly dehydrate and oxidize. This creates a solid crust that blocks the microscopic ink ejection nozzles. When standard software-driven cleaning cycles from the PC utility fail repeatedly, a physical manual descaling becomes necessary. To manually clean the Epson L3250 print head, turn off the printer, unlock and slide the print carriage to the center of the bar, disconnect the vinyl tubes to remove the ink dampers, and use a syringe connected to a flexible silicone tube to gently inject 2 to 3 ml of specialized print head cleaning solution directly into the metal inlet pin of the clogged color nozzle.
This technical procedure requires a high level of physical precision, as applying excessive pressure with the syringe can easily rupture the delicate internal gasket membranes of the print head, ruining the hardware completely. For other common technical repairs, you can also consult our guides on the Liectroux C30B robot vacuum beeping fix or read our analysis of Wi-Fi security camera data consumption.
1. The Anatomy of Epson's MicroPiezo Print Head
Unlike thermal print heads used by HP and Canon (which boil the ink to temperatures exceeding 300°C to eject drops through vapor expansion), Epson employs a proprietary MicroPiezo technology. The print head features microscopic piezoelectric crystals that expand mechanically under high-frequency electrical pulses. This non-thermal mechanism operates at room temperature and provides a much longer physical lifespan.
However, the nozzle plate contains hundreds of microscopic openings, with diameters narrower than a human hair. When the solvent in the ink (water and chemical humectants) evaporates during long idle periods, the remaining pigment or dye particles dry out and clump together. If this dried mass blocks the internal channels or sits right on the nozzle plate, the physical vibration of the piezo crystal cannot eject the ink droplets. Air gets trapped inside, causing faded horizontal stripes or complete color dropouts on printed pages.
2. Tools Required for Manual Cleaning
Before beginning your hands-on intervention on the Epson L3250 hardware, make sure you have the following tools and supplies on your workbench:
- Specialized Print Head Cleaning Solution: A solvent fluid containing surfactants and slow-evaporating active ingredients designed specifically for Epson print heads. Never use rubbing alcohol, glass cleaners, or tap water, as they cause immediate galvanic corrosion on copper electrical traces or deposit mineral salts that clog the nozzles permanently.
- Luer-Slip Plastic Syringe (10 ml or 20 ml): Used to apply gentle hydraulic pressure or create a suction vacuum.
- Flexible Silicone Tubing: Tubing with an internal diameter of approximately 2 mm to 3 mm that fits snugly on both the syringe tip and the print head's inlet pins.
- Absorbent Paper Towels: High-grade paper towels that do not shed lint or paper dust.
3. Step-by-Step Print Head Flushing Procedure
Follow these steps with extreme caution to perform the manual flush:
Step 1: Unlock and Position the Carriage
Turn on the printer. As soon as the print carriage begins its initial boot movements, unplug the power cord directly from the wall outlet. This cuts power to the stepping motors, allowing you to slide the carriage manually to the center of the metal rail for easy access.
Step 2: Remove the Ink Dampers
Open the plastic latch cover on top of the print carriage to expose the four clear plastic dampers. Using your fingers or a small flathead screwdriver, release the tab on the back of each damper and pull it straight up. Set them aside carefully, making sure the vinyl ink tubes do not kink or twist. You will now see the four conical metal pins that feed ink into the print head.
Step 3: Flush the Cleaning Fluid Gently
Place a folded strip of thick paper towel directly underneath the carriage path (between the plastic base and the print head). This is crucial to catch flushing liquid and prevent moisture from dripping onto the optical sensor boards below.
Draw about 2 ml of cleaning solution into the syringe. Attach the silicone tube securely to the metal inlet pin of the clogged color. Apply gentle and steady downward pressure on the syringe plunger. You should feel slight resistance. The cleaning fluid should flow slowly down the inlet pin and exit the nozzle plate below, where the paper towel will absorb it. If the plunger is completely stuck, **do not force it**, as excessive pressure will blow out the internal seals. Instead, pull back slightly on the plunger to create a suction vacuum, clearing the obstruction before attempting to flush again.
| Clog Severity | Plunger Resistance | Recommended Syringe Action | Estimated Success Rate |
|---|---|---|---|
| Mild (Faded lines on nozzle check) | Very low (Fluid flows almost freely) | Inject 2 ml slowly and continuously. | High (~95%) |
| Moderate (Color missing entirely) | Medium (Requires light thumb pressure) | Apply gentle pulsations (push and pull 0.5 ml back and forth). | Moderate (~75%) |
| Severe (Printer idle for over 6 months) | Completely locked (Plunger will not push) | Let the cleaning solution sit inside the pin for 20 minutes. Apply gentle suction. Do not force. | Low-Medium (~40%) |
4. Reassembly and Recovery Cycle
After flushing the affected colors, remove the soiled paper towel from beneath the carriage. Clean any spilled liquid off the surrounding plastic parts. Push the dampers back into their matching slots until you hear them click into place. Close the carriage cover latch.
Plug the printer back in and turn it on. The system will detect that the carriage was moved and will run a startup cycle. Since the dampers and print head channels now contain a mixture of cleaning solution, the first few test pages will print faint or completely blank. **Execute a standard print head cleaning cycle from your computer's utility menu** to force the peristaltic pump to draw fresh ink from the EcoTanks, priming the dampers and purging the remaining cleaning solution. Print a nozzle check sheet to verify print quality.
5. Crucial Preventive Maintenance
To avoid having to perform this manual print head flush in the future, adhere to these simple maintenance habits:
- Print at Least Once a Week: Print a color test sheet that utilizes Cyan, Magenta, Yellow, and Black. This forces fresh ink to flow through the microscopic nozzles, preventing stagnation and drying.
- Keep the Printer Plugged In: The Epson L3250 performs silent micro-maintenance cleaning runs at night if left in Standby mode, wiping the nozzle plate with the internal capping station's rubber blade.
- Use Original Epson Inks Only: The original chemical formulation prevents particulate build-up and preserves the integrity of your MicroPiezo nozzles.
Managing Printhead Vent Chambers and Pressure Caps During Cleaning
The MicroPiezo printhead features individual ink intake stems connected to internal chambers. When injecting cleaning fluid, small air bubbles can get trapped inside the nozzle chambers, causing gaps in test prints. After flushing the printhead, wait at least one hour for the cleaning solution to settle. This allows any trapped air to rise to the top of the chamber, ensuring a continuous flow of ink when you resume printing.
Inspecting the Purge Pump Assembly for Proper Suction Performance
The purge pump assembly is located beneath the capping station and provides the suction needed to draw ink through the nozzles. If the pump tubes are blocked with dried ink, standard cleaning cycles will fail. Clean the capping station cap rim and ensure the pump lines are clear of blockages. This ensures the printer can perform successful auto-cleaning cycles and maintain print quality.
Inspecting Nozzle Plates Under Magnification for Physical Damage
If print quality does not improve after manual cleaning, the nozzle plate may be scratched or damaged. Use a magnifying glass to check for scratches. If the plate is damaged, the printhead must be replaced. Avoid touching the plate with metal tools during cleaning, as this can easily scratch the delicate metallic surface.
The Risks of High Pressure Syringe Cleaning on MicroPiezo Chambers
Many users cause permanent damage by forcing cleaner fluid too hard through the ink stems. Epson MicroPiezo chambers rely on microscopic membranes that easily rupture under sudden high pressure. When pushing cleaning solution, do it with absolute gentleness. If you encounter significant mechanical resistance, stop immediately. Applying force will split the thin internal barriers of the printhead, mixing colors and ruining the printhead.
When to Replace the Damper Units Instead of Performing Flushes
Dampers act as reservoir valves regulating printhead ink pressure. Over time, their internal seals can dry out or develop microscopic air leaks. If your printer prints fine initially but begins to fail after 2 or 3 pages, the dampers are likely failing to maintain a vacuum. Replacing the dampers with fresh units is inexpensive and solves the flow problem permanently without putting stress on the printhead nozzles.
The Role of Capping Station Gaskets in Preventing Nozzle Dry-Out
The capping station is equipped with a soft rubber gasket that seals the printhead when the carriage is in the home position. If the gasket is dirty or misaligned, air leaks in, causing the ink on the nozzle plate to dry out. Clean the gasket regularly with a damp, lint-free cloth to remove dried ink and ensure a tight seal, preserving print quality.
Preventing Printhead Ink Clotting by Using Original Ink Tank Fluids
Using third-party or generic inks changes the chemical viscosity inside the printhead chambers, accelerating ink drying and nozzle clogging. Epson's original ink formulations contain specific surfactants and moisturizers that prevent ink from drying inside the MicroPiezo nozzles. Using genuine fluids reduces the frequency of manual cleanings, preserving printhead performance and prolonging its lifespan.
Cleaning the Rubber Wiper Blade to Avoid Smearing Nozzles
Below the capping station is a small rubber wiper blade designed to scrape excess ink from the nozzle plate. If this wiper gets coated with dried ink and paper dust, it will smear debris across the nozzles, causing blockages. Wipe the rubber blade gently with a lint-free swab dampened with distilled water to ensure proper operation.
How Purge Pumps and Capping Station Seals Maintain Nozzle Vacuum
The automatic nozzle cleaning system relies on a purge pump located beneath the capping station to draw ink through the printhead. If the rubber gaskets on the capping station are dirty or misaligned, air leaks in, preventing the pump from creating the vacuum needed to clear clogs. Wipe the capping station seal regularly with a damp, lint-free cloth to remove dried ink and ensure a tight seal, which helps keep the printhead clean.
Cleaning the Capping Station and the Home Position Gasket Seals
The capping station is a critical component of the Epson L3250 that seals the nozzle plate when the printhead carriage rests in the home position. If the soft rubber gasket surrounding the capping station accumulates dried ink and paper dust, it cannot maintain an airtight seal. This causes air to leak into the nozzle chambers, drying out the remaining ink and causing blockages. To clean this area, dampen a lint-free swab with warm distilled water and gently clean the rubber gasket edge, ensuring a smooth surface for sealing.
Using Ultrasonic Baths for Extremely Stubborn MicroPiezo Nozzle Clogs
If chemical flushes and syringe pressure fail to clear a stubborn clog, an advanced method is using an ultrasonic cleaning bath. This process requires removing the printhead from the carriage and placing it in a shallow tray filled with printhead cleaning solution, ensuring that only the metal nozzle plate is submerged to prevent shorting the electrical board. The ultrasonic waves create micro-vibrations that break down dried ink particles inside the nozzles. This method should be used as a last resort due to the risk of damage.
Frequently Asked Questions (FAQ)
Can I use water or rubbing alcohol to clean my Epson L3250 print head?
No. Tap water contains minerals (like calcium and chlorine) that form deposits and clog the nozzles permanently. Rubbing alcohol evaporates too quickly and can dry out and damage the print head's internal rubber sealing gaskets. Always use specialized Epson print head cleaning solution.
Does resetting the ink level indicator clear air bubbles from the tubes?
No, resetting the virtual ink levels does not affect the physical ink flow. If you have large air gaps inside the vinyl ink delivery tubes, you must run a "Power Ink Flushing" cycle from your PC driver or manually draw ink through the dampers using a syringe.
How do I know if my Epson L3250 print head is burned out or just clogged?
If a color prints completely blank even after manual flushing (without a single line appearing), or if the printer shows a fatal hardware error with flashing lights immediately upon turning on, the print head has likely suffered an electrical short (burned out), or the F1/F2 fuse on the mainboard has blown due to ink leaking into the electrical ribbon contacts.


