How to Fix Epson L3250 Button Copy Function Not Responding
The Epson EcoTank L3250 multifunction printer is widely praised for its high-yield ink performance and ultra-low cost per page, making it a staple in domestic spaces and small corporate offices alike. However, one of the most frustrating technical hardware anomalies reported by users is the sudden failure of the standalone copy function—which allows you to duplicate document sheets quickly by pressing the physical buttons on the control panel without turning on your desktop computer. When this button input fails to respond, it compromises the immediate convenience of the printing hardware.
If your Epson EcoTank L3250 copy button is not responding when you try to make a copy directly from the physical panel, the issue is typically caused by an active error state (such as out-of-paper or paper jam indicated by blinking status LEDs), a dirty or misaligned CIS scanner carriage, a loose or damaged scanner flat ribbon cable, or a firmware lockup that requires a hard electrical power cycle to reset the mainboard. Resolving this hardware block involves checking a systematic list of software and mechanical variables to narrow down the fault.
1. Understanding the Standalone Copy Mechanism on the Epson L3250
To understand why the L3250 standalone copy button fails, we must analyze the hardware operations that happen during a localized photocopy execution. When you press either the Black Copy button (represented by an icon with solid black sheets) or the Color Copy button (represented by overlapping outlines), the printer executes a direct instruction set managed solely by its internal system-on-chip ASIC on the main formatter board. No external PC driver or operating system print spooler is involved in this standalone routine. The board sends electrical pulses to the stepper motor, driving a rubber belt that slides the Contact Image Sensor (CIS) carriage along its linear guide rails beneath the flat glass bed.
As the scanner carriage moves, built-in light-emitting diode arrays illuminate the target document placed on the glass surface. The reflected light bounces off the document and strikes a dense grid of silicon photodetectors, which convert the optical intensity into digital signals. The main processor handles these digital raster graphics on the fly, translating the matrix coordinates directly into ink droplet firing patterns sent to the MicroPiezo printhead. For this process to run successfully, all diagnostic sensors on the printer must report normal status. If any sensor (such as the sheet-feed opto-sensor or the printhead carriage encoder sensor) reports an active fault, the logic board locks out all copy requests as a safety precaution.
Additionally, the physical control panel is connected to the formatter board via a thin, multi-conductor Flexible Flat Cable (FFC). In environments with high humidity or after physical shipping shocks, the contacts on this ribbon cable can shift or corrode. When this happens, pressing the physical copy buttons fails to generate the necessary low-voltage interrupt signal on the mainboard microprocessor, leaving the device completely unresponsive to your physical inputs.
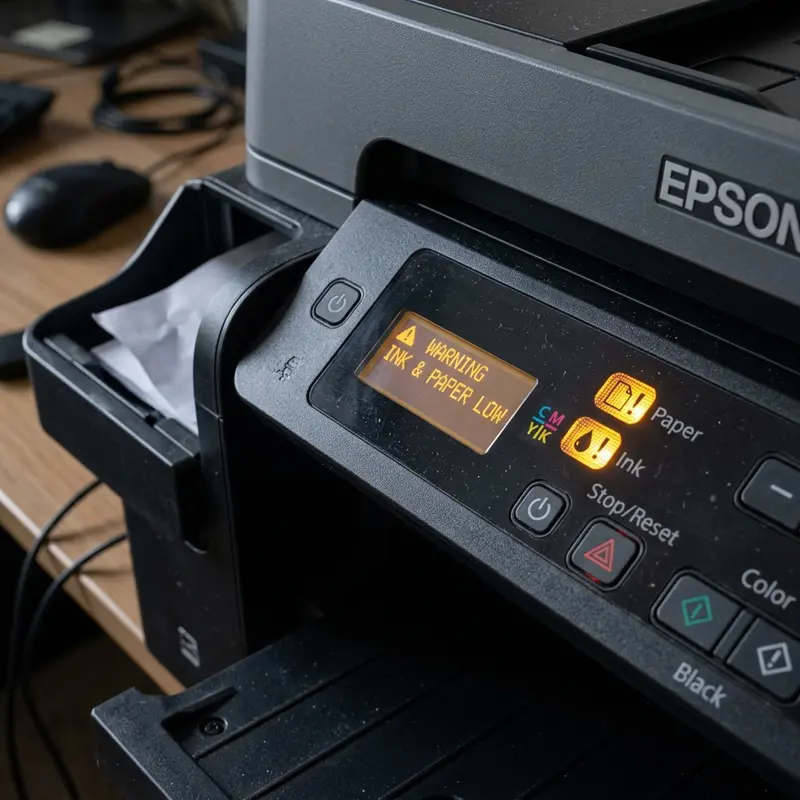
2. Visual Diagnosis: Deciphering the Blinking LED Status Patterns
When the control panel copy function on your Epson L3250 fails to execute, the device's status LEDs (light-emitting diodes) provide clear visual telemetry to diagnose the underlying block. You should closely inspect the blinking patterns on the interface panel before attempting any repairs.
Here are the common LED failure signatures that block standalone copy functions:
- Alternating Blinking of Ink and Paper LEDs: This indicates that the internal ink waste counters (waste ink pad life) have reached their logic saturation threshold. When this threshold is crossed, the printer triggers a hardware lockout to prevent excess waste ink from overflowing its felt pads onto your desk. The printer ignores all inputs, including the copy buttons, until the counters are reset.
- Simultaneous (In-Sync) Blinking of Ink and Paper LEDs: This indicates a mechanical obstruction, such as a paper jam in the roller path, a foreign object blocking the printhead carriage, or dust on the optical encoder strip that tracks carriage positioning.
- Power LED Blinking Rapidly alongside Solid Error LEDs: This indicates a critical system error (Fatal Error). This error commonly results from a seized scanner motor or a blown fuse on the mainboard logic circuitry following an electrical voltage spike in the power outlet.
- Blinking Red Wi-Fi LED: A blinking network light does not block local copy functions. Because standalone copying is a local loopback process, the printer does not require network connectivity or active router handshakes to scan and print documents.
If your device is displaying any of these warning codes and you need more details on troubleshooting flashing error sequences, read our comprehensive diagnostic guide for Epson L3250 flashing all lights, which explains how to unlock the formatter board.
3. Step-by-Step Guide to Resolving Panel Copy Failures
If the printer powers up, shows a solid green power LED, but fails to respond when you press the physical copy buttons (Black or Color), perform the following step-by-step diagnostic checks to resolve the issue:
- Perform a Hard Power Cycle: While the machine is turned on, pull the power cord directly out of the back socket. Do not use the power button. Leave the machine unplugged for 5 minutes. During this time, press and hold the physical power button on the panel for 30 seconds to drain any residual voltage from the capacitors on the mainboard. Plug the power cord back in and boot the unit. This clears the RAM cache and forces the firmware to re-calibrate all sensors.
- Check the Scanner Carriage: Verify that the CIS scanner assembly is not physically blocked. Lift the scanner lid and inspect the glass surface for heavy dust or residue. Clean the glass with a microfiber cloth and a drop of isopropyl alcohol. If the carriage is stuck at the wrong end of the bed, the startup self-test will fail and block copy inputs.
- Ensure Paper is Properly Loaded: Load clean, white, 75g/m² printer paper into the rear paper guide. Slide the plastic edge guides flush against the paper stack without bending it. If the paper is skewed or the tray is empty, the reflective optical media sensor will not detect paper, preventing the copy process to save ink.
- Clear the Print Spooler Queue on Your PC: Connect the printer to your computer via USB. If there is a corrupted, paused document stuck in the operating system's print queue, the printer's mainboard will remain dedicated to that print job, ignoring physical button commands. Clear the print queue on the computer before testing the copy buttons again.
These troubleshooting steps address the majority of logical faults and media loading errors, restoring standalone copying without needing to disassemble the hardware.
4. Hardware Issues: Testing the Scanner Assembly and Flat Ribbon Cables
If physical resets and software cleaning cycles do not restore the copy function, the issue may be a hardware failure in the internal cables. The Epson L3250 uses two distinct Flexible Flat Cables (FFCs): a long ribbon cable connecting the CIS scanner sensor to the logic board, and a smaller ribbon cable connecting the control panel buttons to the mainboard.
To determine if the scanner assembly itself is functional, run a test scan from your computer. Open the "Epson Scan 2" software on your PC and click "Scan" or "Preview". Observe the physical movement of the scanner through the glass bed:
- The scanner lights up but does not move: This points to a failed stepper motor or a broken conductor on the FFC ribbon cable that supplies power to the motor.
- The scanner carriage moves, but the scanned image on screen is blank, dark, or contains colored vertical bars: This indicates the CIS sensor array is damaged, or the white calibration strip on the underside of the plastic glass bezel is dirty, preventing the scanner from performing its initial white balance calibration.
- The scanner works normally when triggered from the PC, but the copy buttons on the printer remain unresponsive: This confirms the scanner hardware is fully functional. The fault lies entirely with the physical button switches or the control panel's connection cable.
If you suspect a damaged or torn ribbon cable (often caused by insect intrusion, moisture, or improper transport), the damaged FFC must be replaced. This repair should be handled by a certified technician or an experienced hardware specialist.
5. Diagnostic Ledger for the Epson L3250
Use the matrix below to match the printer's LED patterns with the most likely hardware cause and find the correct solution to resolve the issue:
| Panel LED Status | Copy Button Behavior | Underlying Technical Fault | Corrective Action |
|---|---|---|---|
| Only Power LED is Solid Green | No mechanical movement or sound | Corroded control panel FFC or oxidized microswitches. | Perform a hard power cycle. Check or replace the control panel ribbon cable if needed. |
| Paper LED Blinking Red | Beeps once, Power LED flashes | Media sensor does not detect paper or is dirty. | Reload paper, align the guides, and clean the feed rollers of any paper dust. |
| Ink and Paper LEDs blinking alternately | Ignores input completely | Ink absorber pad counter has reached its limit. | Reset the waste ink counter using utility software and replace the physical waste ink pads. |
| Power LED flashing rapidly | Carriage tries to move, then locks up | Scanner motor is obstructed or carriage rails lack lubrication. | Check the glass bed for obstructions, clean the guide rails, and reboot the printer. |
6. Re-flashing and Updating the Epson L3250 Firmware
In rare instances, copy failures from the control panel stem from a corruption or crash of the printer's firmware. This microcode, stored in the motherboard's EEPROM flash memory, can occasionally become corrupted due to power outages during automated updates or electrical surges that disrupt the memory sectors.
To update or reinstall the firmware on your printer, follow this official procedure:
- Connect the printer to your computer using a USB cable. Do not run firmware updates over a Wi-Fi connection, as signal drops can corrupt the firmware installation and permanently damage the motherboard (bricking the device).
- Go to the official Epson Support site, locate the page for the EcoTank L3250, and download the full driver and utility installer package.
- Run the "Epson Software Updater" utility. The tool will check Epson's update servers for the latest stable firmware version for your model.
- If an update is available, check the box next to the firmware option and click "Install". Do not power off the printer or disconnect the USB cable during the 5 to 10-minute installation process.
- The printer's status LEDs will flash in various sequences during the update. Wait until the printer reboots automatically and shows a solid green power LED before using it.
Updating the firmware resets the system variables and logic paths of the microcontroller to factory default settings, clearing software bugs that may have disabled the hardware interrupts for the physical copy buttons.
7. Cleaning the Cap Station and Maintenance of the Suction Pump
A key but often overlooked maintenance item for Epson EcoTank printers is the care of the capping station and ink suction pump. When the printer is idle, the printhead rests over a rubber seal (cap station) connected to a silicone tube and a peristaltic pump. This mechanism creates a vacuum seal that pulls fresh ink through the nozzles to keep them moist and clear of air bubbles.
If the suction pump becomes blocked with dried ink or the rubber seal loses its shape, the printhead will draw in air, leading to dried ink residue in the nozzle channels. This shows up as severe banding or blank colors in your printouts, even if the ink tanks are full. Periodically running nozzle checks and cleaning cycles, and checking the capping station for ink buildup, helps maintain print quality and prevents unnecessary repair trips.
Frequently Asked Questions
What should I do if my Epson L3250 copy button doesn't work?
First, check the control panel for blinking error lights (paper or ink warnings). If no error lights are active, unplug the power cord from the back of the printer and leave it disconnected for 5 minutes to reset the system. If the issue remains, run a test scan from your computer to check if the scanner hardware is functioning.
Why does my Epson L3250 power on, but the copy buttons don't respond?
This is often caused by a loose or damaged ribbon cable connecting the control panel to the logic board, or a print job stuck in the computer's print spooler. Clear any pending documents in your computer's print queue and test the copy buttons with the data cables disconnected.
Can I make copies on the Epson L3250 without a computer or network connection?
Yes. The photocopy function is completely standalone and runs directly on the printer's firmware. You only need paper loaded in the rear tray, sufficient ink in the EcoTank reservoirs, and no active error lights showing on the control panel.
How do I reset the Epson L3250 when the paper and ink lights blink alternately?
Alternating flashing lights indicate that the waste ink pads have reached the end of their service life. To resolve this, you must physically replace the waste ink pads at the back of the printer and use a software reset utility to clear the electronic counter in the printer's firmware.


